Dramatic start to the day…

Getting to know a tree -OneTree365

Onetree365.com
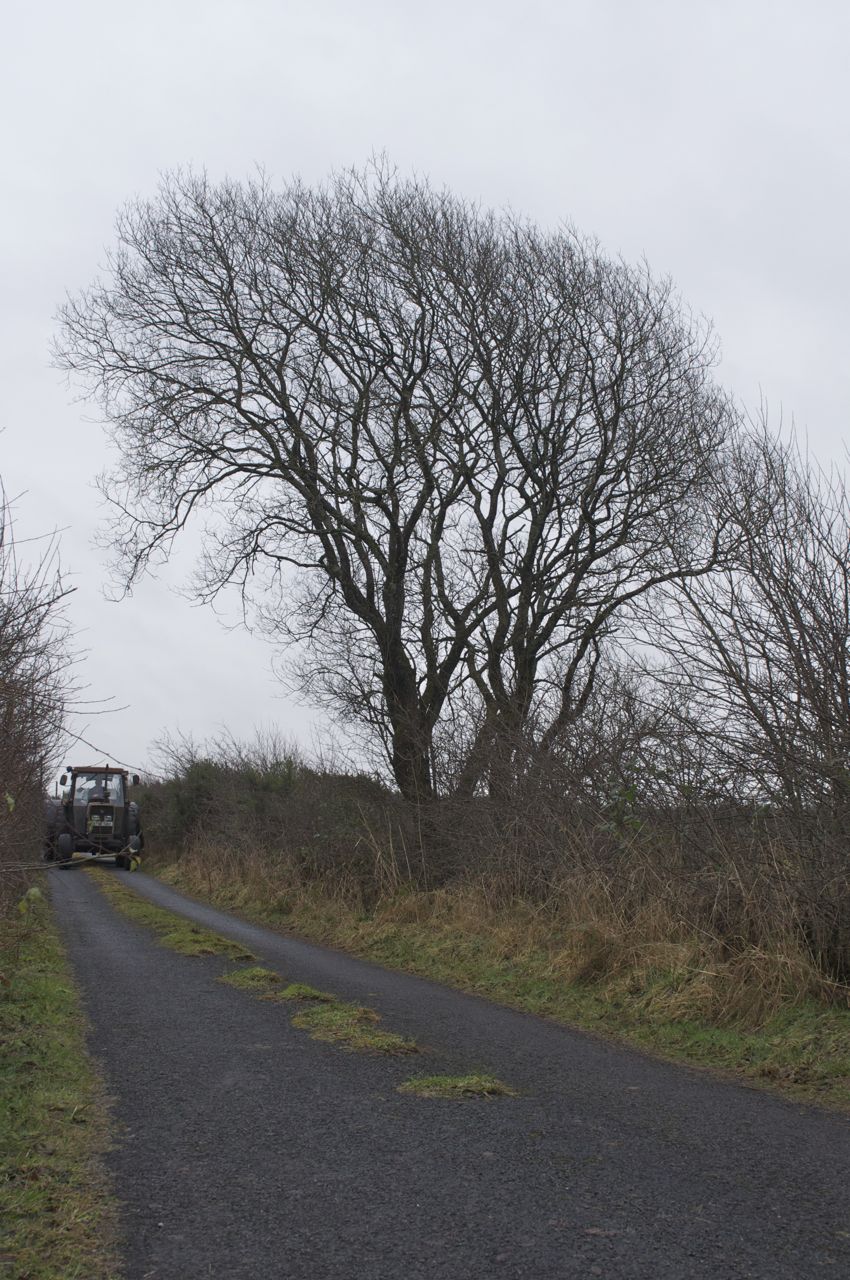
On December 4th, I decided to start a project, a photography project, but also an exercise in tree appreciation and observance of nature. Taking time each day to spend a few minutes observing a tree and its surroundings. Already I have been surprised by how different a willow tree can look in a photograph each day, and even throughout the day.

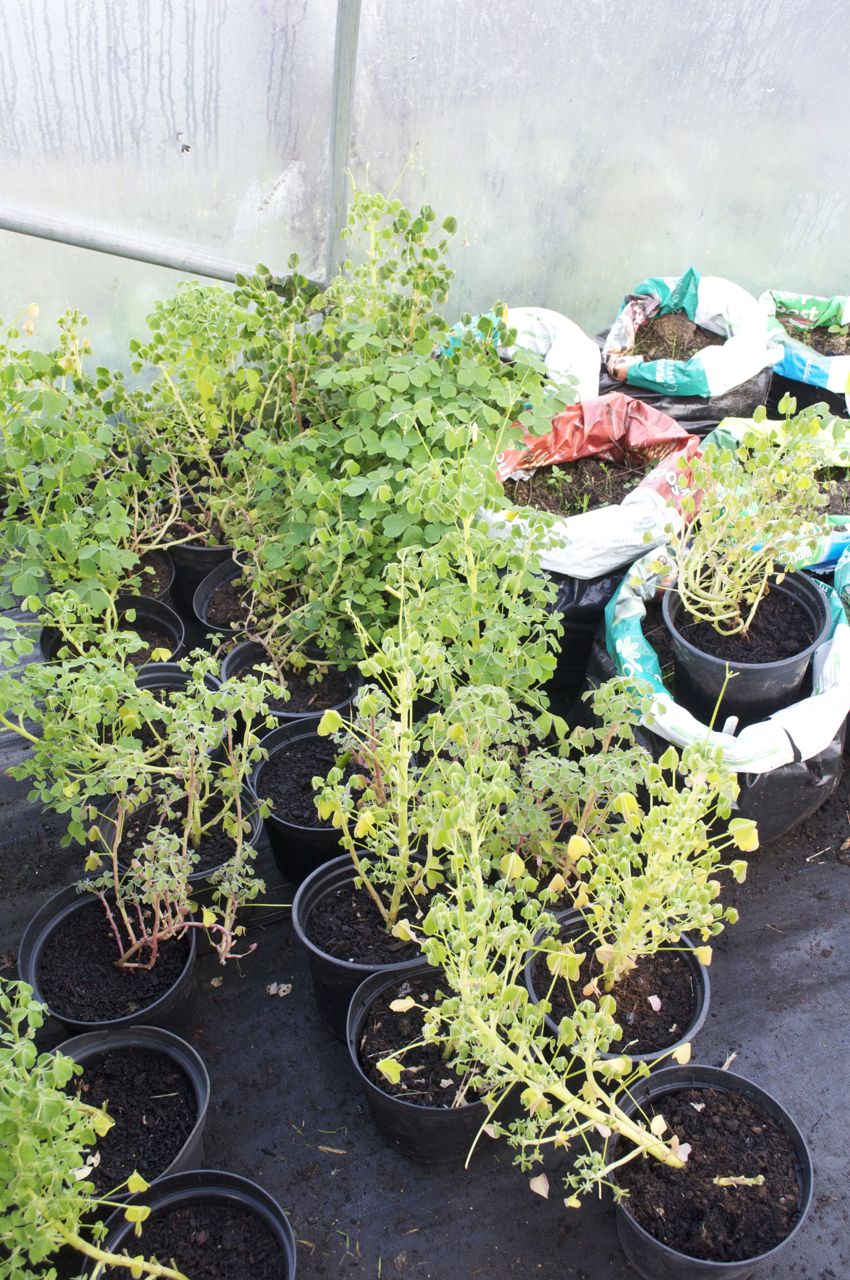
I decided to use this willow which grows close to our house for a number of reasons; it is a native tree, possibly a spontaneous seedling in the hedgerow, it is close to my home so I can observe it each day without the need to travel, convenience makes my year long commitment easier. The fact that it is an unremarkable species in terms of rarity or uniqueness is important, horticulturists are often guilty of only valuing exotic species with flamboyant flowers, foliage or bark or for their rarity, we horties can be a tad snobbish about plants. So this willow, an unassuming arboreal neighbour was chosen for the fat that is ordinary. But it has its qualities to admire, its winter outline, the form sculpted by wind and time. It has pride and character, and like all trees it draws from the earth as it reaches to the heavens, making food from the air and water in the soil, providing us with oxygen to breathe and maybe one day with carbon rich wood to burn. In the meantime it hosts insects, food for birds that stand on its branches and sing. Like very tree, it is important, it is beautiful.
Each day I take a photo of the tree and upload it on www.onetree365.com –

Share this:

Winter beauty smells so good – Winter Flowering Shrubs
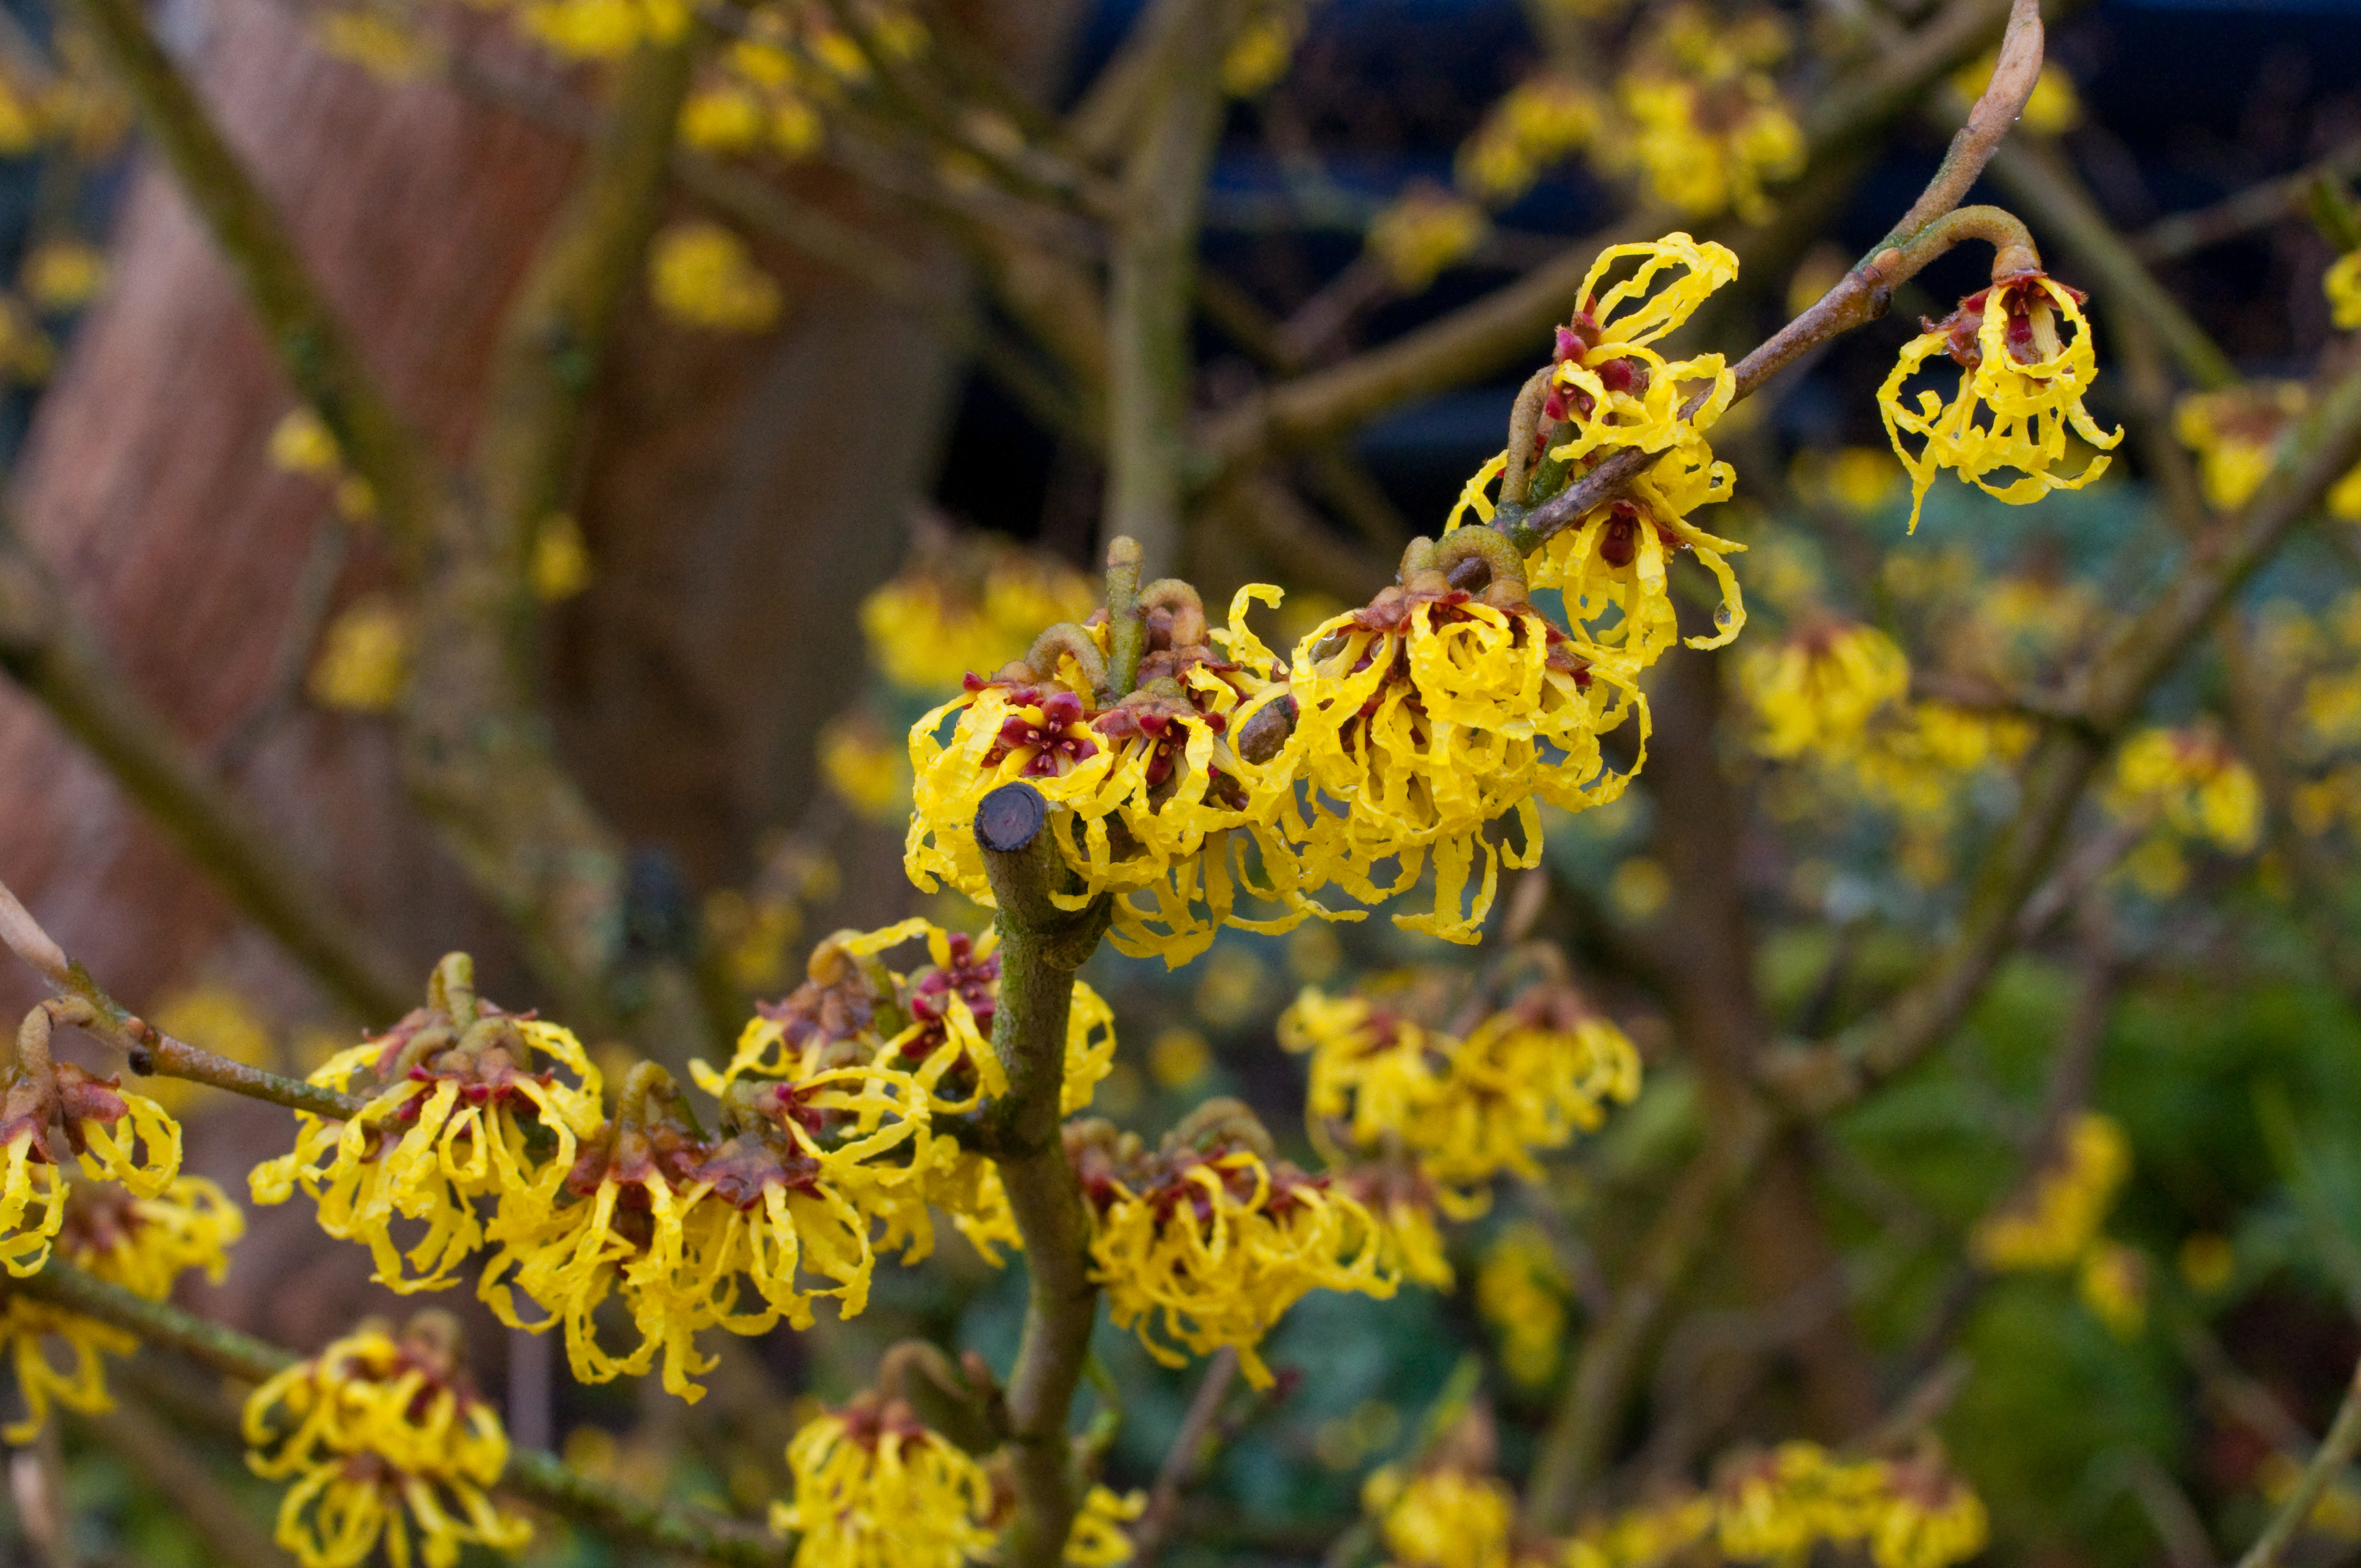
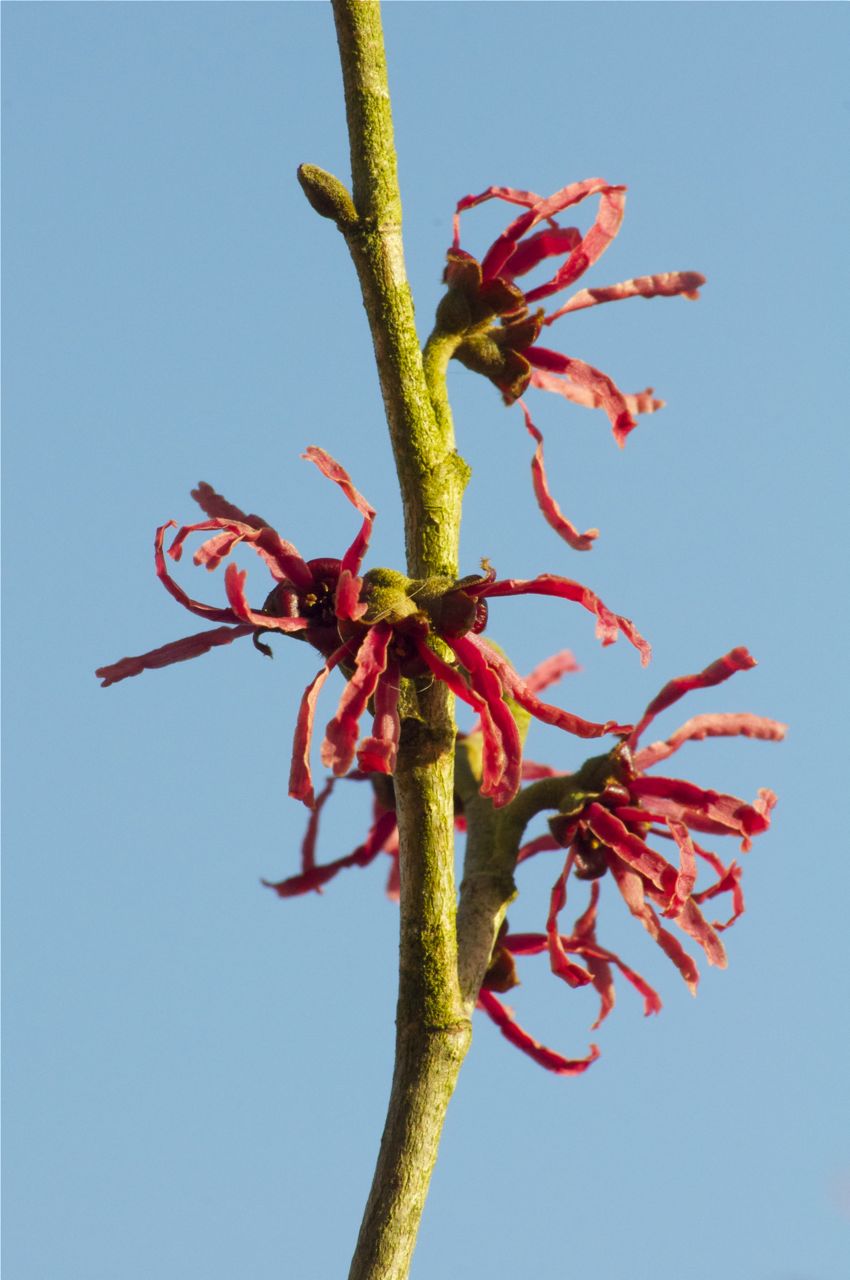
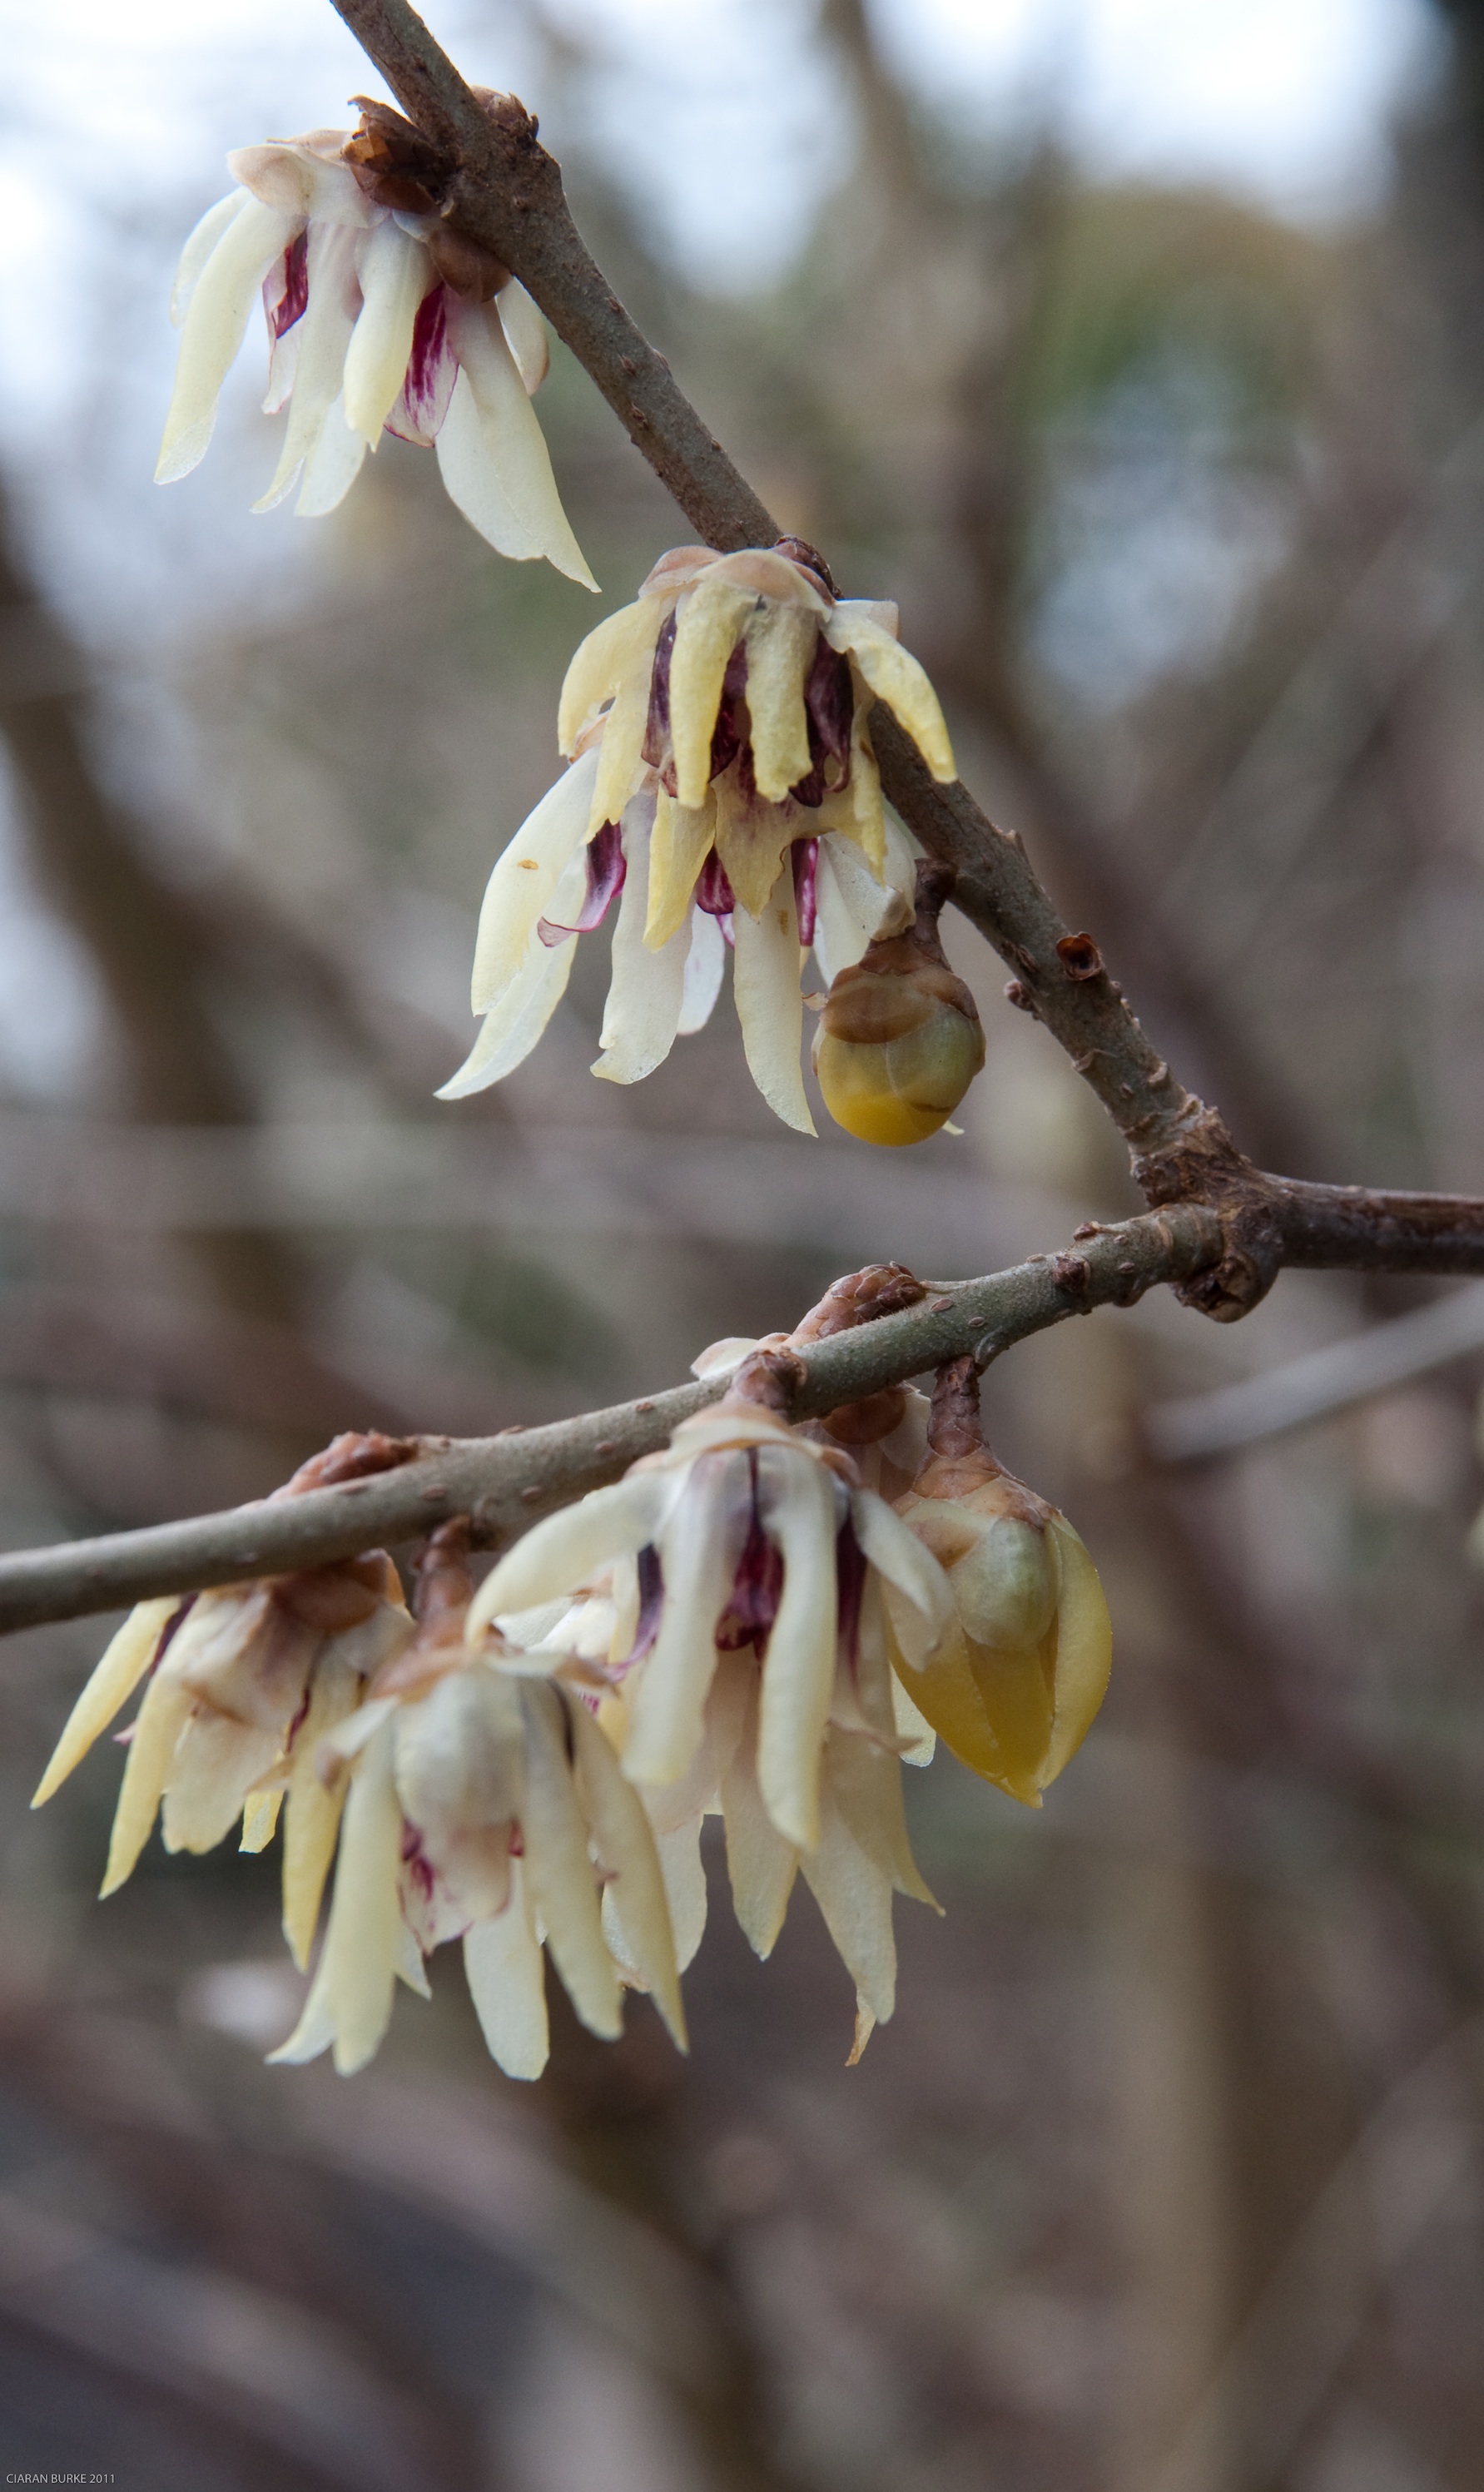
Sweetness and spice… inhale! Ah yes… sniffing the delicious scent of witch hazel flowers is good for the soul. The fuzzy yellow flowers, or orange or red, depending on the cultivar, are borne with delicacy along barren stems as the darkest days start to stretch towards a brighter spring.The sweet spicy scent of Hamamelis x intermedia ‘Arnold Promise’ is one of my favourite fragrances in the garden. The hybrid witch hazels are crosses between two asian species, H. mollis from China and the japanese H. japonica, and there are many fine cultivars from which to choose. We grow the red flowered H. ‘Ruby Glow’, but unfortunately it lacks the rich scent of other cultivars.
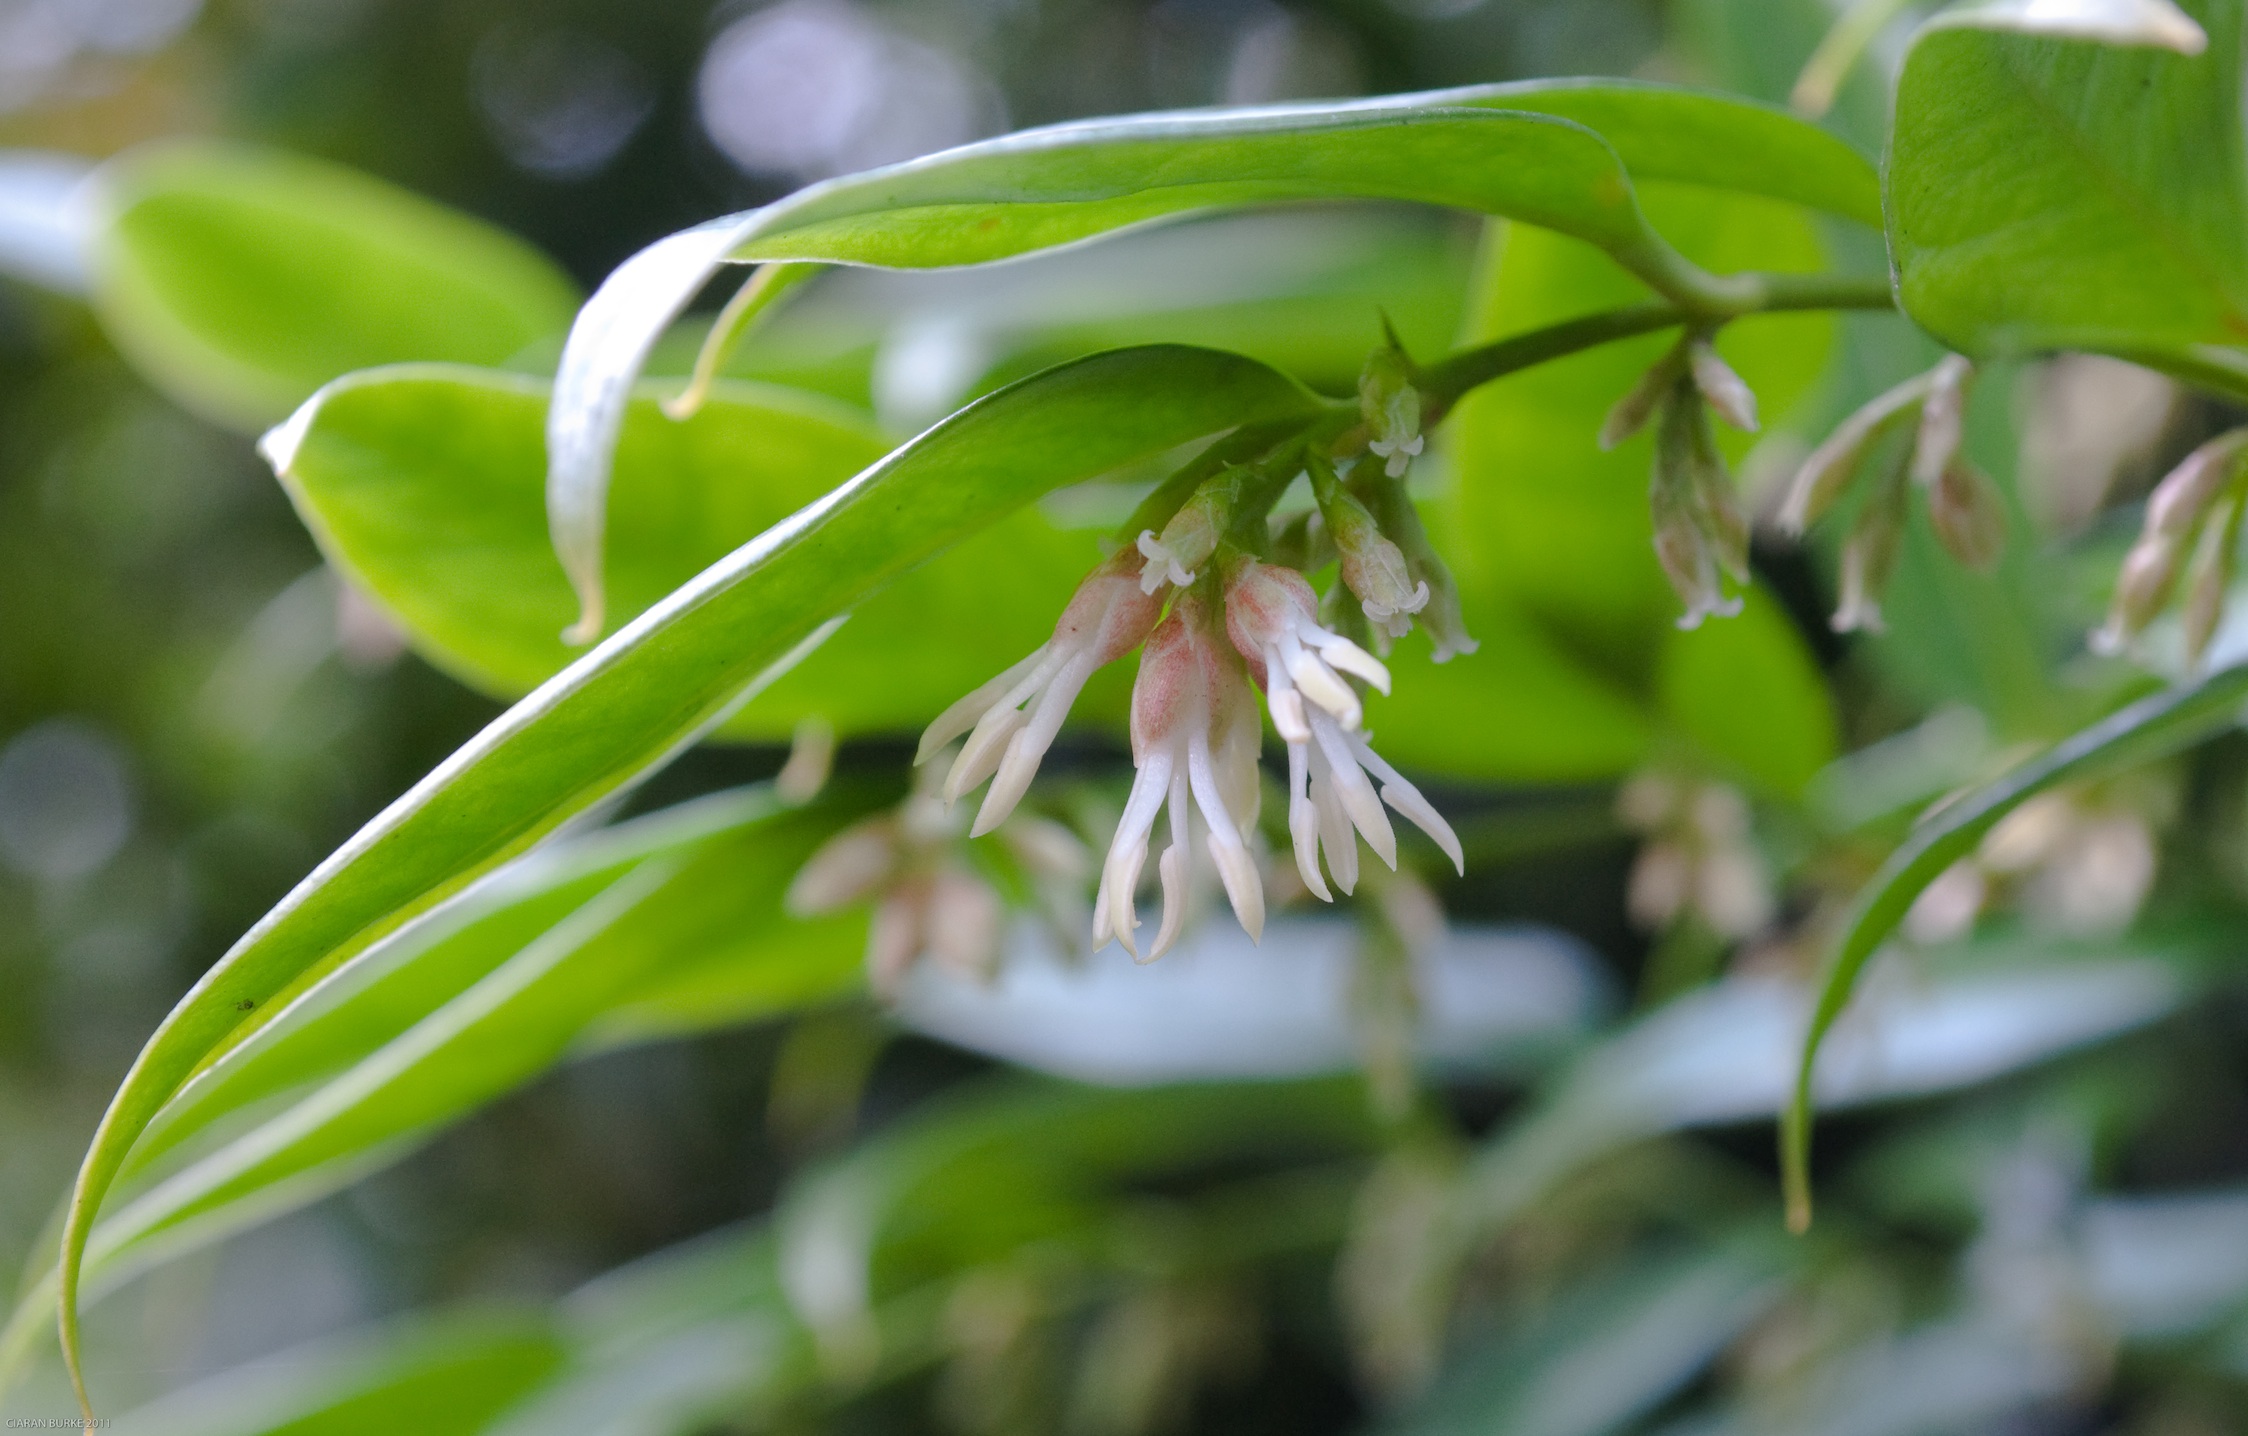
Under a large old native hawthorn tree, new shoots of aconitums are emerging from the cold earth, reaching to the light and creating green splashes on a blank canvass of winter soil, blank except for the three young bushes of Sarcococca hookeriana var. humilis. This trio of dwarf evergreen shrubs have tiny flowers without petals, the white blooms borne in the leaf axils and on a calm day their scent journeys through the air, filling the air with sweetness.
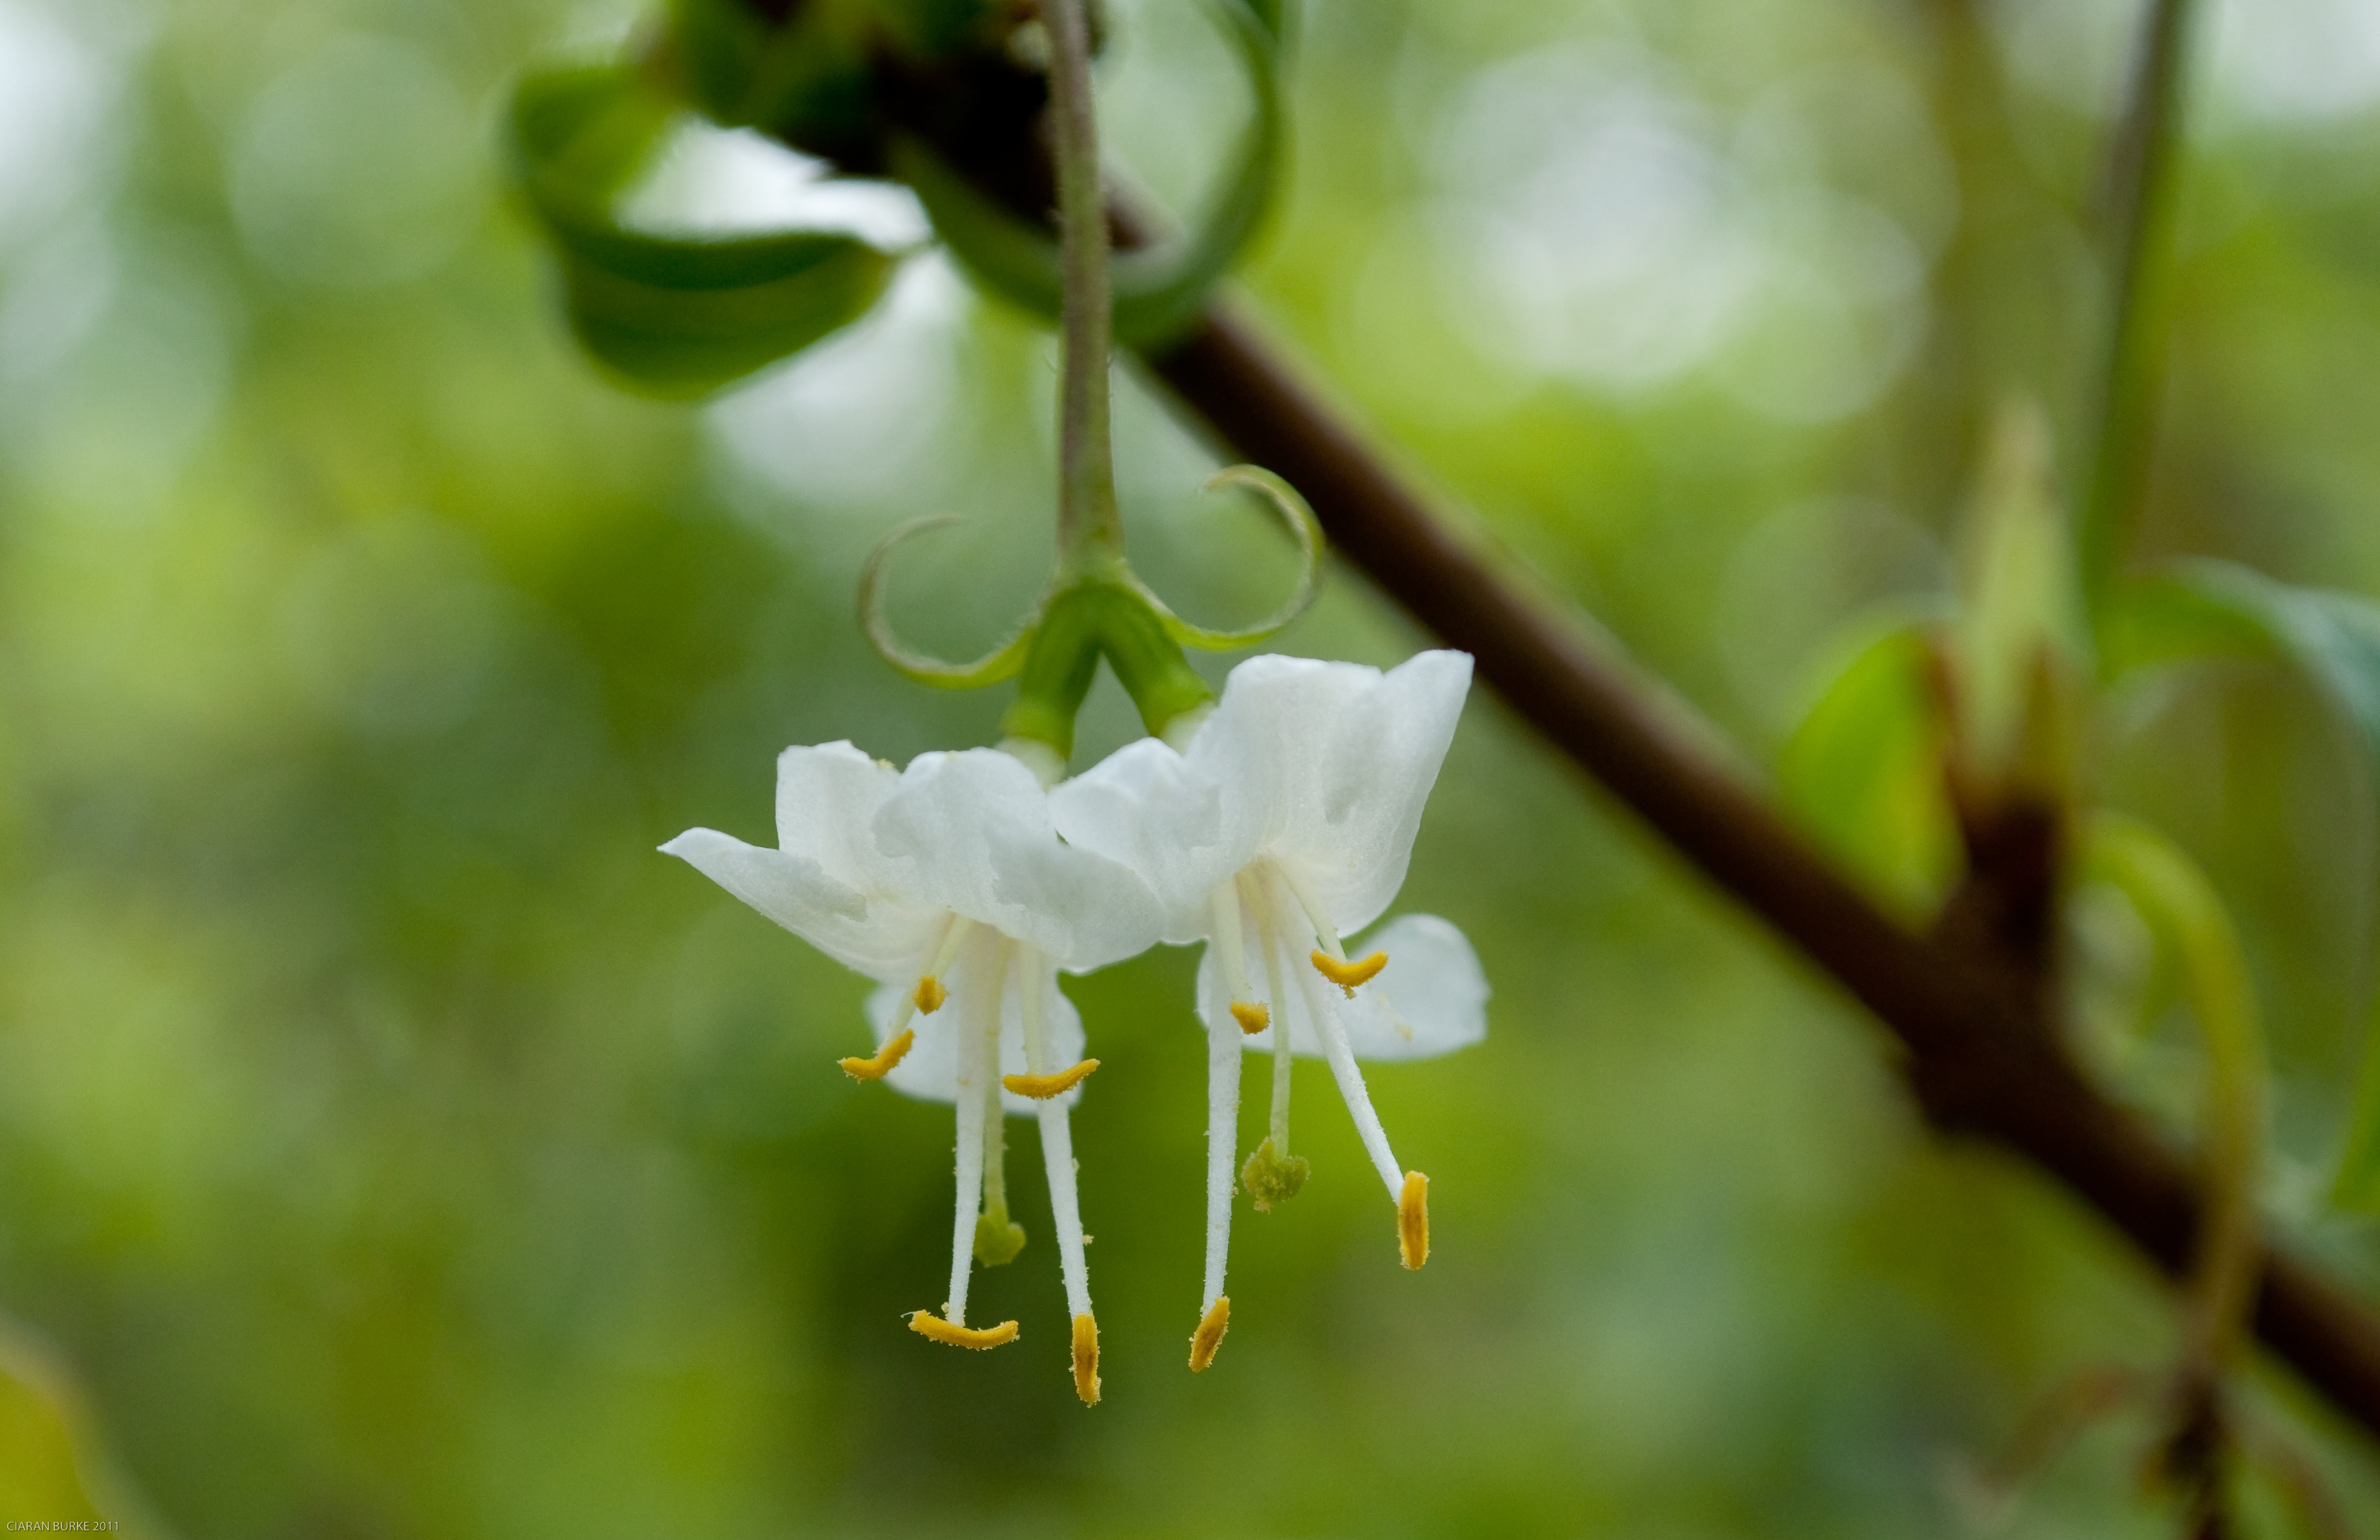
The delicate almost translucent flowers of the bush honeysuckle, Lonicera fragrantissima, possess a fragrance similar to their woodbine cousins that scramble through hedgerows in summer. Borne in pairs the pale blooms are coloured only by yellow anther tips of their stamens, but their smell brings a warm glow of summer-like scent to a cold winter’s day.
I checked the naked stems of the winter sweet shrub, hoping in vain to see flower buds, but we will have to wait at least another year for the pleasure of smelling the scent from the pale glassy yellow flowers of Chimonanthus praecox. Young shrubs need time to flower, each january since we planted it a few years ago we hope to see signs that is has at last matured to flowering, but we will have to wait a while longer.
A shorter wait for us will be to enjoy the most magnificent winter scent of Daphne bholua ‘Jacqueline Postil’. The deep pink buds are loosening, the petals starting to unfurl. I checked it yesterday, but I knew long before any close inspection that it was not yet blooming. When in full bloom, it is more likely to smell the plant before you see it, such is the power of its perfume, wafting on calm winter air throughout the garden like no other shrub.

Daphne bholua was introduced to western gardens from the Himalya in 1938, it is a shrub that still remains in comparative obscurity despite having a heavenly scent and one of unmatchable strength in the winter season, perhaps in any season. It has pproved hardy through the two cold winters of recent times, losing its foliage after temperatures of minus 17 Celsius, but recovering well in Spring. A large and quick growing shrub to 2.5 metres or more, evergreen or sometimes deciduous, depending on cultivar and climate, it us unsurpassable in winter beauty and an invaluable asset to any garden where a gardener has a working nose and an appreciation of scent.
Share this:

Gotcha Oca! Oxalis tuberosa – A new root crop with a future?

I first grew Oxalis tuberosa about fifteen years ago. I received the seed from a seed list, it was listed as an alpine plant from South America. I grew it in a well drained compost, lean, without much fertilizer and it eventually produced an attractive yellow flower. It was quite nice. Last year I was re-acquainted with this Oxalis, under quite different circumstances. A gardening firend of mine, Carmen Cronin who runs the Clare Garden Festival gave me some tubers of a vegetable plant which she described as having shamrock-like leaves and that it came from South America. I suspected that it was indeed my old friend O. tuberosa, although she called it OCA and pronounced it Och- ah.

Well I was intrigued! The tubers were waxy textured and brightly coloured, some red, some yellow, others almost white. The following week I planted them in pots with the help of some students taking part on The New Growth Project course that we run in our garden. We watched the plants closely, all were curious to see how they would grow, would these funny looking tubers be a substitute for the beloved spud? We joked that one day people might be ordering bags of Oca fries to go with their burgers.
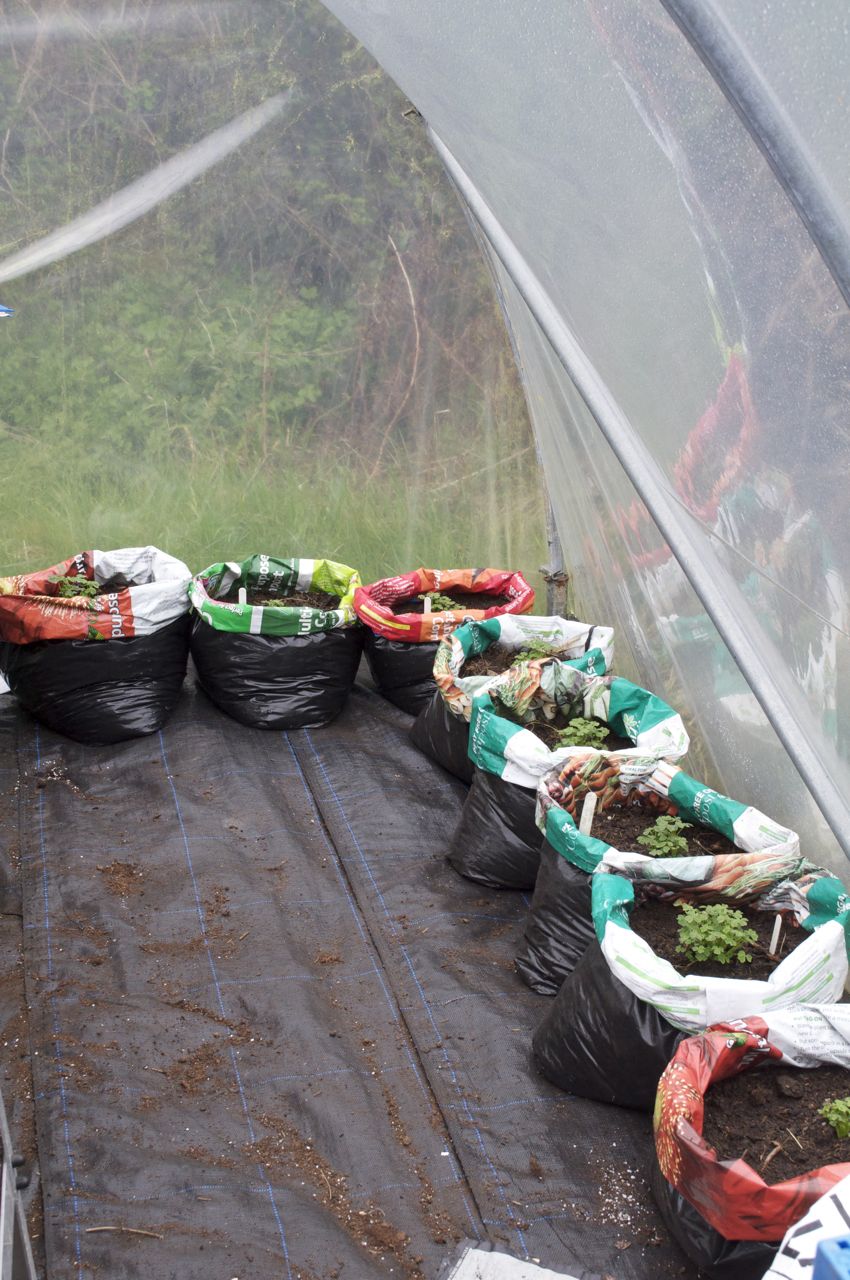
That was back in April. We planted the tubers in 2 litre pots of garden compost and later potted on the plants into re-cycled compost bags filled with more of the garden compost. These were kept in the polytunnel where we work with the students. The growth of the Oca was far more than I expected and by mid-summer we were battling for space with the South American vegetables.

Ocas are relatively unknown as a vegetable, apparently they grow them in New Zealand where they call them yams, which is a very misleading name. Oca or Oxalis tuberosa are related to wood sorrel, Oxalis acetosella, a native of Irish woodlands. The foliage is very similar being trifoliate and shamrock like. The foliage can be eaten, it has an acidic sour taste which is quite appealing, similar to sorrel.
Oca will grow vigorously, some of the plants produced stems 2 metres (over 6ft) long by the autumn. Oca are not suitable for growing outdoors in all parts of Ireland, early frosts will turn the fleshy stems to mush before tubers start to form. The plants have a short day photoperiodic response for tuber formation which means that tubers do not start to form and swell until mid-October. Covering the plants with polythene or fleece will help protect them from light frosts.

GROWING OCA – MY EXPERIENCE
I found that plants in the polythene tunnel also got frost damaged when temperatures went below zero degrees Celcius (32F). As the days got shorter the students and I checked the plants weekly. After the tomato plants were cleared from our upper tunnel we moved the plants that we had been fighting for space in our potting tunnel to the bed vacated by the tomatoes. We laid the trailing stems of the Oca on the beds. Along the stems small tubers started to form. Portions of the stems that were covered with soil developed larger tubers. Next year I will earth up the tubers more as some close to the surface had holes eaten in them by birds. Otherwise the Oca were untroubled by pests and untroubled by diseases. I did not give any extra fertilizer to the plants while they were growing as the plants were growing so big, but addition of supplementary fertilizer low in nitrates might help increase the yield of tubers if applied late in the growing season. We kept the plants watered throughout the summer.

During late summer I experimented with taking cuttings of the Oca plants. They rooted quickly and easily and by Christmas most of the plants had made one or two decent sized tubers. I will use these plants for replanting this year.

HARVESTING AND COOKING OCA
Our first harvest of the tubers was made just before Christmas. Two good portions were made from a well cropping bag.
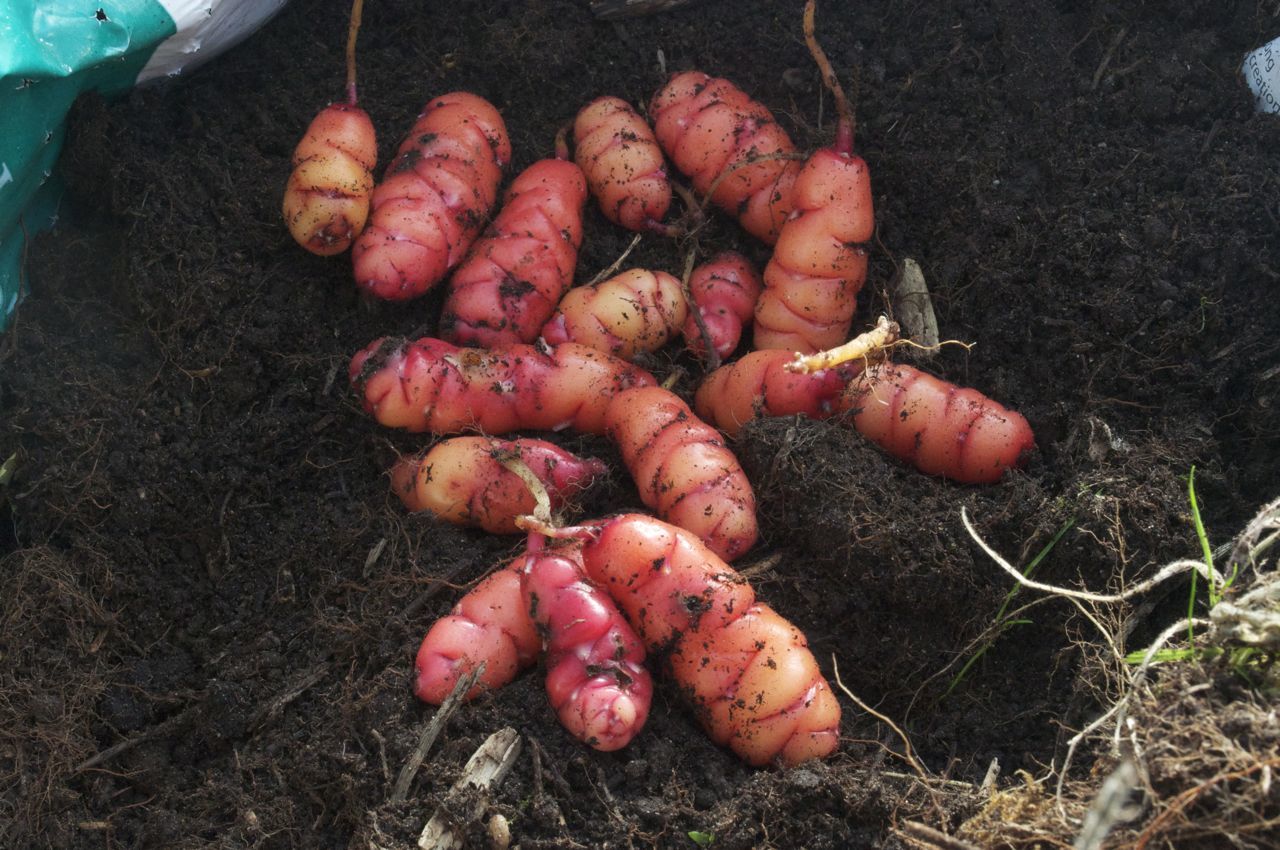
So after all this, how do Oca taste? On Christmas Eve my wife and I roasted our first harvest of red and yellow Oca tubers. Oca tubers can even be eaten raw, but i prefer to cook them. They can be fried, boiled, steamed, deep fried or roasted. After washing the well, they are easy to clean due to their smooth and waxy skins. We then tossed them in rapeseed oil and baked them for about 20 minutes until they were tender.

OCA ARE DELICIOUS! They remind me a little of a fried potato seasoned with vinegar.
So next season we are going to grow more Oca. I look forward to experimenting with them; I am going to take cuttings from the first flush of growth and see if the plants make more tubers, I will earth up the stems as they grow. I will also experiment with day length control, and try to induce tuber formation early by covering the plants with black polythene for a few hours each morning to produce a shorter day length.
I can see it now, fast food outlets on Saturday nights after closing time “Do you want Oca fries with your burger?” “Yes please!”


Share this:

The First Weeds Are The First Harvest- Chickweed Soup Recipe

Happy New Year!
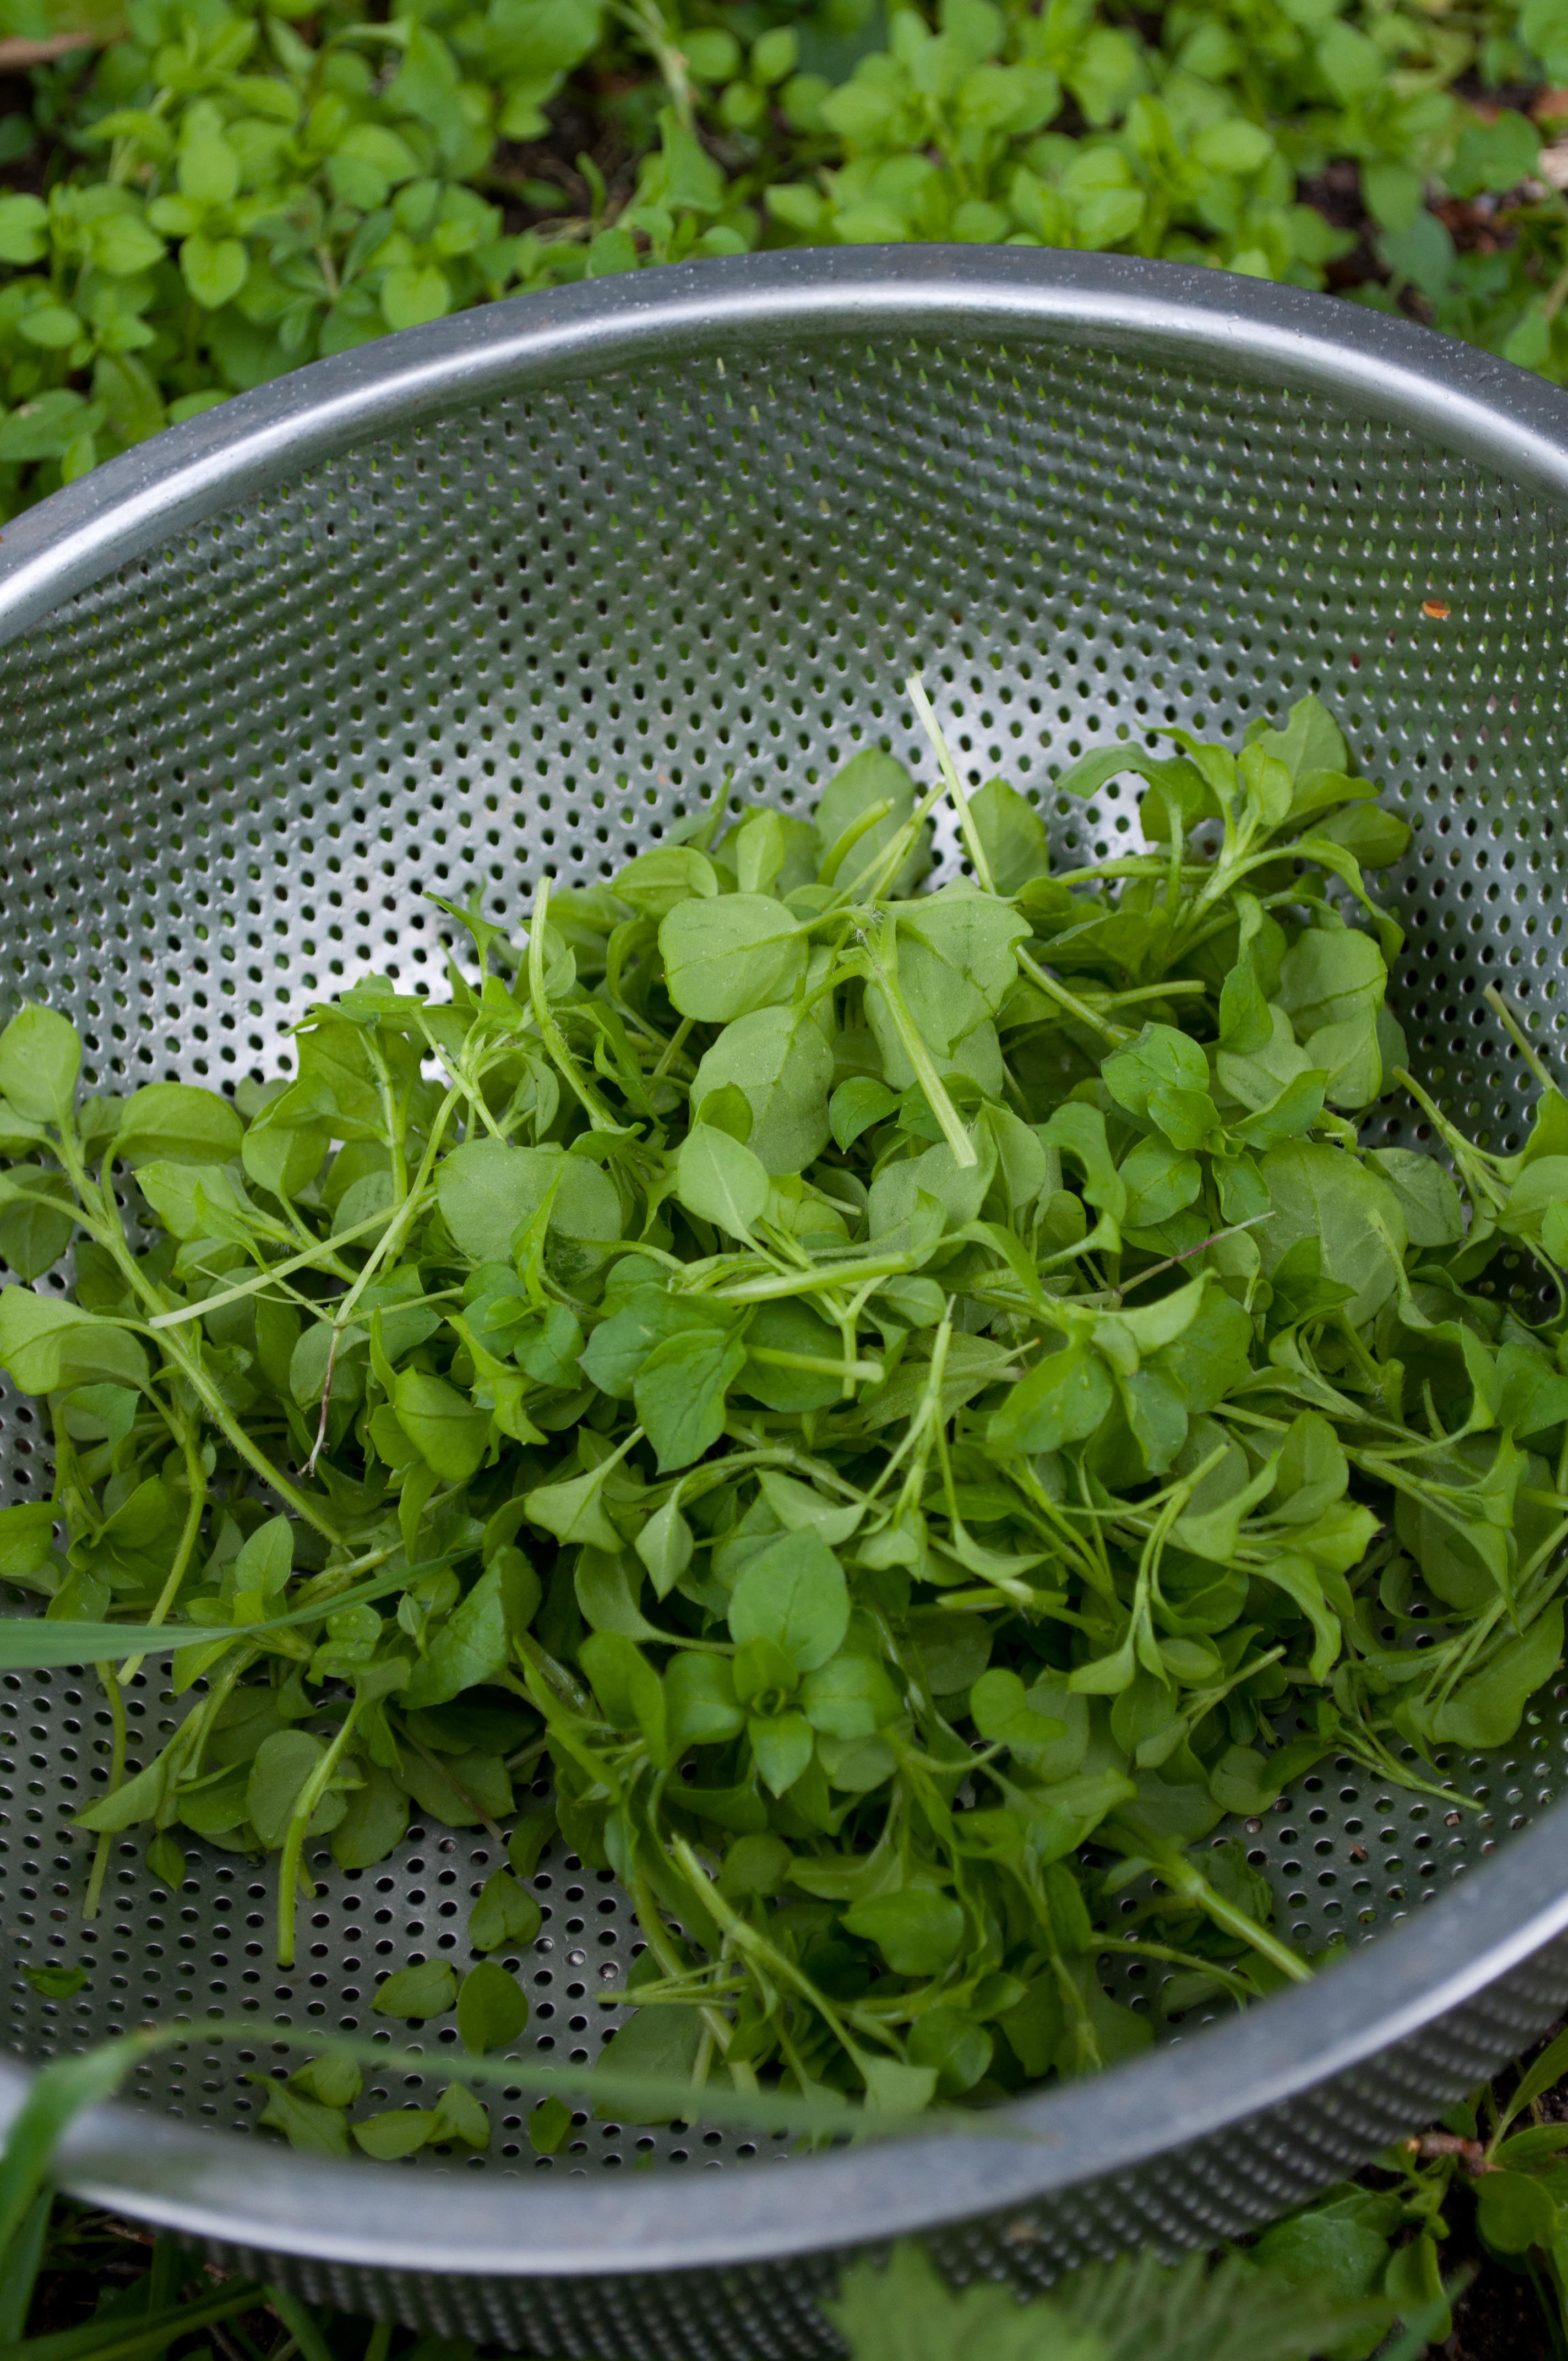
the weather here in the west of Ireland has been unusually mild, which is great in some respects; I can look forward to inhaling the sweet fragrance of Daphne bholua flowers in the next few days, the gorse bushes are about to flower and I can soon enjoy some sweet gorse flower cordial, about 2 months earlier than last year! The downside of the mildness is that weeds keep growing, some have not stopped at all. One that has kept a year round presence in our garden is Stellaria media, known as chickweed or mouse eared chickweed. Luckily it is a tasty plant that can be made into a delicious soup or included in a pesto. So the year’s first weeding session can also be this years first harvest!

Chickweed, Stellaria media, is an annual weed which can germinate at any time of year. Its botanical name refers to the starry white flowers that are produced at the ends of the lush green growth. Chickweed often grows in abundance in recently disturbed ground, the seeds are stimulated into growth by light. So when you have done a hard days work getting the flower beds all neat and tidy or sown some vegetable seeds in a carefully prepared seed bed, the first thing you can expect to see is a fresh crop of chickweed starting into growth.
Every one of its flowers is self fertile and each seed pod can produce 2500 seeds. These seeds can lie dormant in the soil for up to four years. When growing well they can re-seed within 6 weeks of germinating. Chickweeds foliage is rampant and can easily swamp out slower growing seedlings and young plants.

Chickweed is easy to remove by hand or by hoeing in dry weather. Disturbance of the soil does however encourage a new batch of seeds to grow. A troublesome weed for all gardeners, so what better way to exact your revenge than to eat it, turn it into to lunch or dinner and make a nice soup, it is easy.
Only collect chickweed from ground that has not been treated with weed killers, never collect from busy roadsides or public places. Make sure you know the plant you collect is definitely chickweed, if you are not sure, never take a chance!
CHICKWEED SOUP RECIPE
INGREDIENTS
- •1 Medium onion
- •2 Small potatoes
- •1 Litre of chicken or vegetable stock
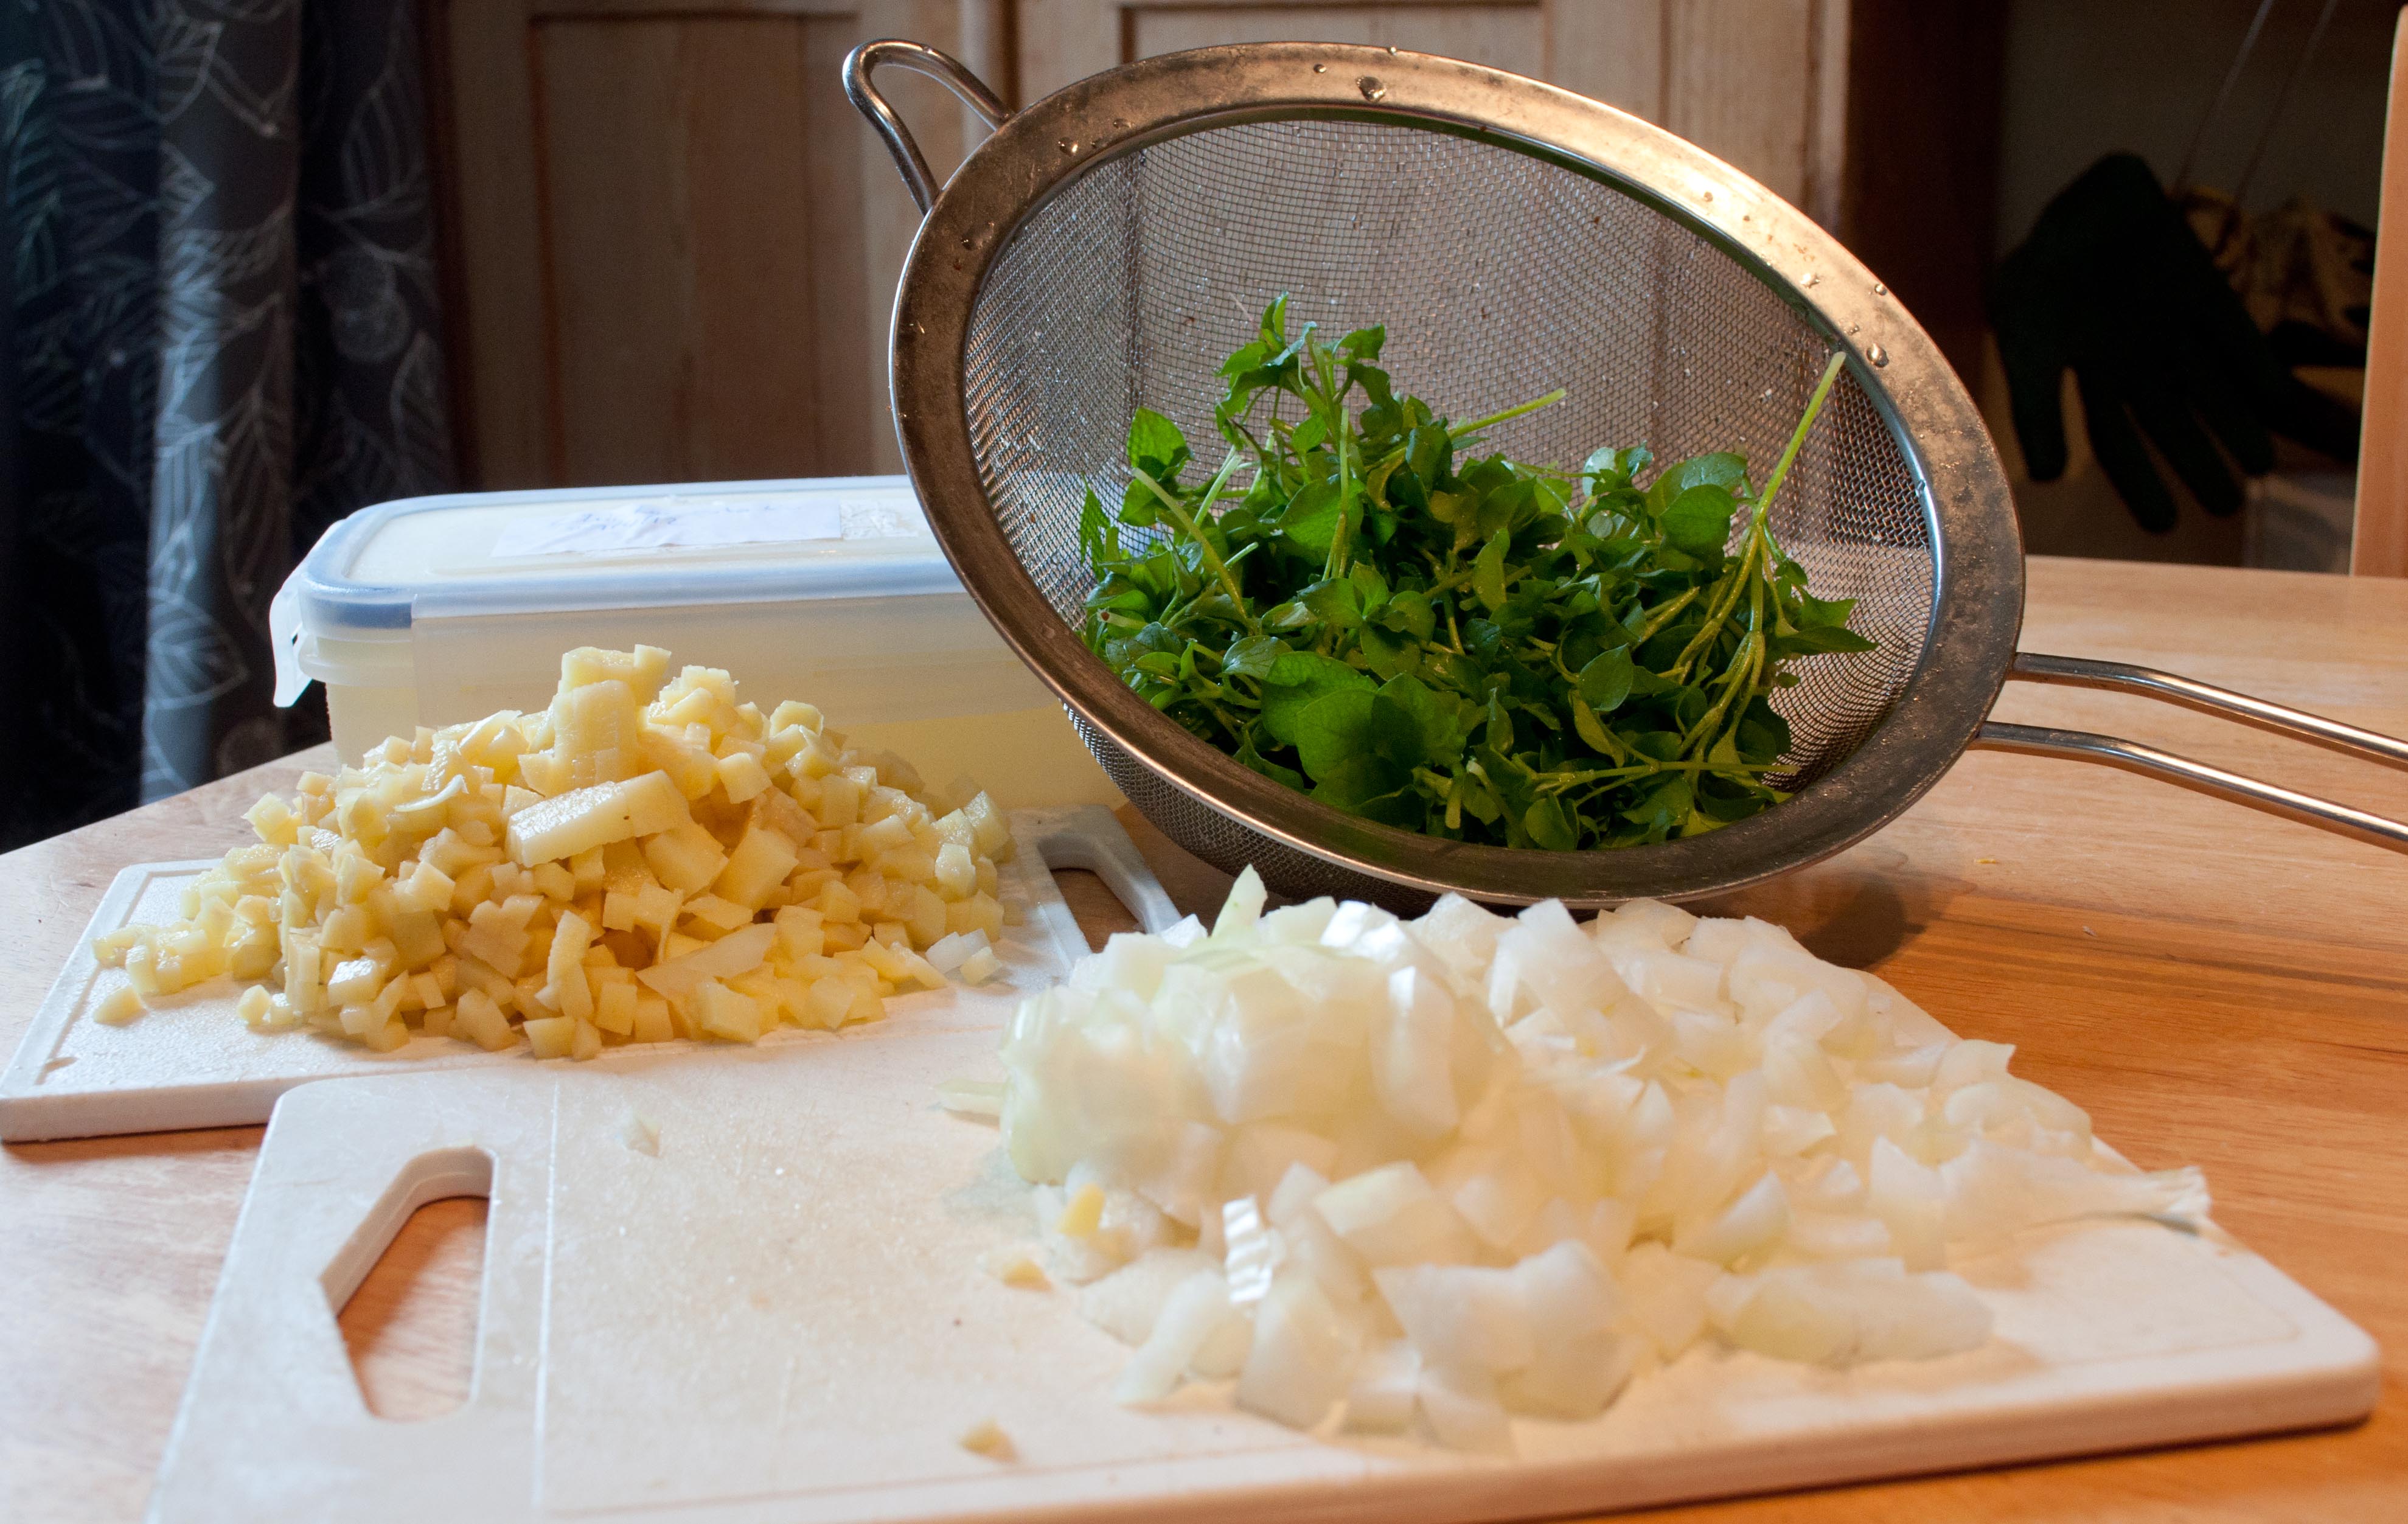
- •2 Good handfulls of chickweed pulled from the garden, only use fresh green growth which has not flowered.
- •Water
- •A good knob of butter and some olive oil
- •Salt and Black pepper
Preparation
- 1.Peel and finely dice the onion
- 2.Peel and finely dice the potatoes
- 3.Remove big stalks from the chickweed and wash well

Cooking
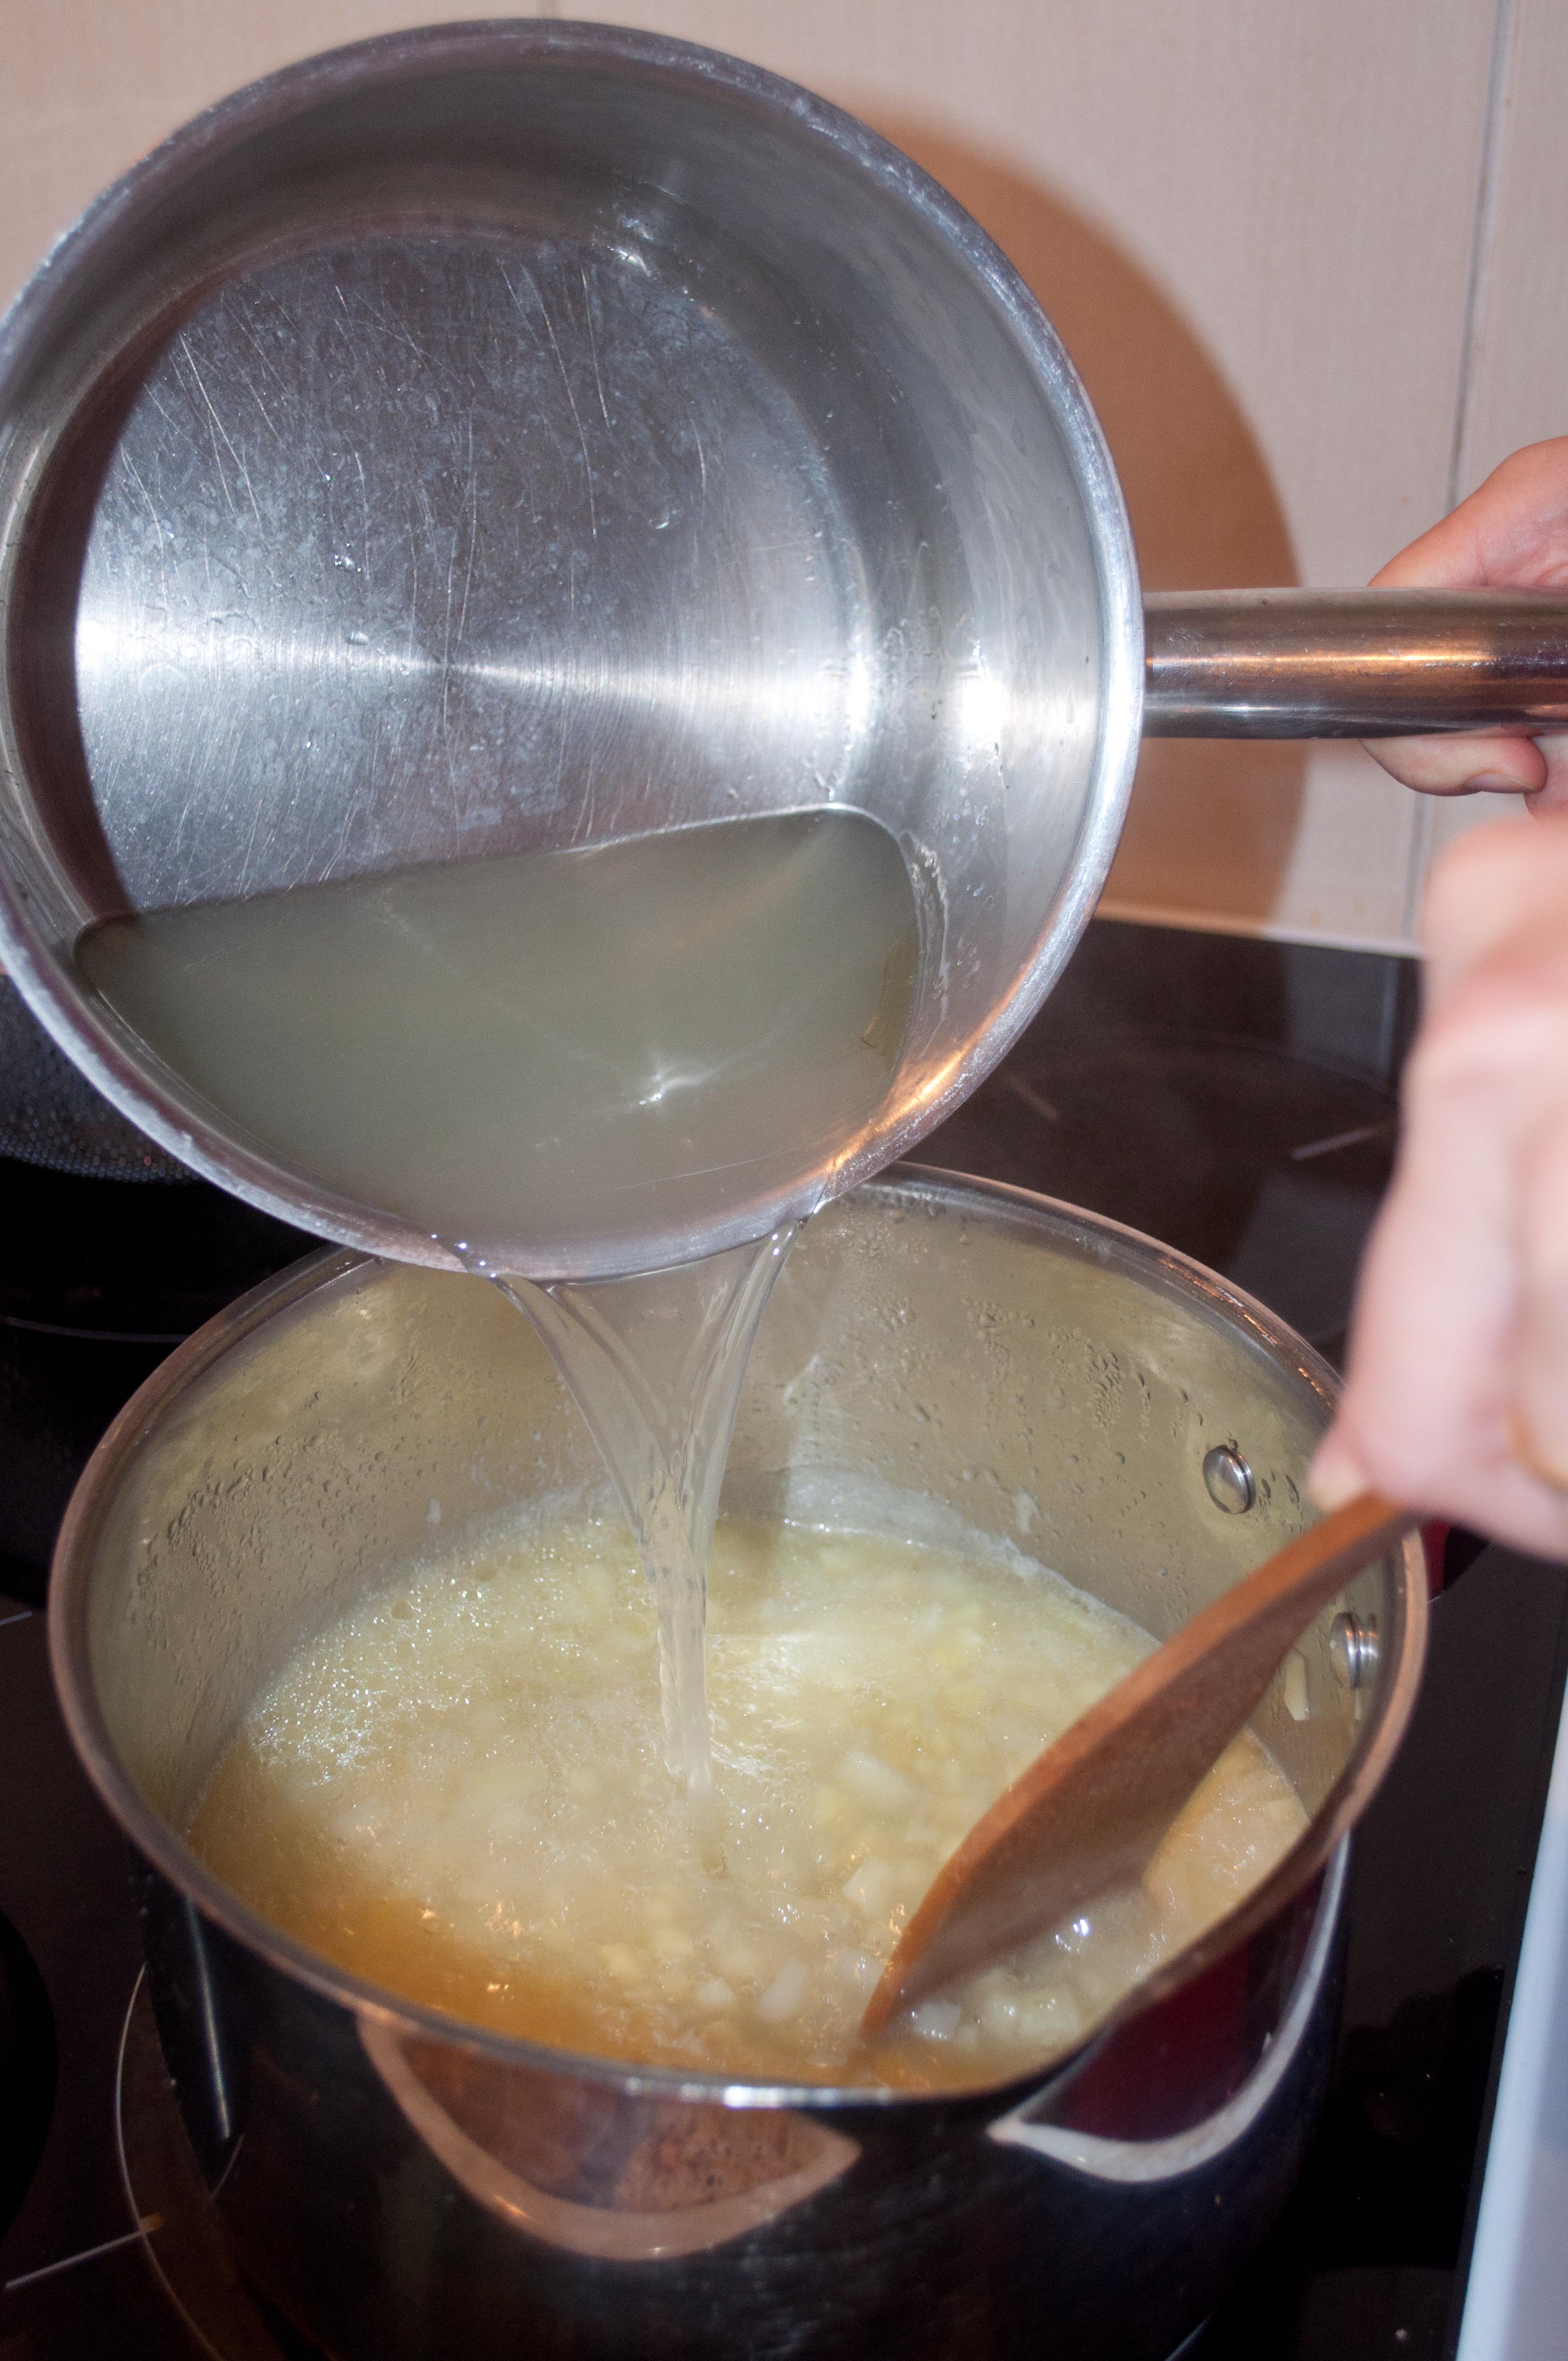
- Melt the butter in some olive oil in a large saucepan
- Saute the onion until soft and golden but do not let it burn.
- Add the diced potatoes and stir in the oil for a couple of minutes.
- Add a little water, enough to cover the potatoes and simmer until the potatoes are soft.
- Then add the chicken stock and cook until it is boiling.

When onions are soft pour in the chicken or vegetable stock - Throw in the chickweed leaves and simmer for about ten minutes.

Cook until the potato is soft then add the fresh chickweed and cook for a further 5-10 minutes before blending with a hand blender - Season with salt and pepper.
- Remove pan from the heat and use a hand blender to blend the soup.


Now serve and enjoy.

Share this:

Hanna’s Stars – A guest blog by my wife

Hanna has been very busy being crafty this Christmas, she ran a workshop earlier this month on creating Christmas Wreaths, paper lanterns adorn our mantle piece and over the last few days the view from our windows is of stars, both at night and during the day. Stars of red shine bright by day light, in the evening the glow to the outside world by the warm light of the living room.
Everyone who sees them admires them, and they are asking me how to do them. Well that is for Hanna to tell, she is the crafty one in our house…
16-pointed star
Materials:
- Coloured or white transparent paper, also called kite paper. (Coloured tissue paper doesn’t give same glowing effect.)
- Set square
- Pencil
- Eraser
- Liquid craft glue (water soluble is always better)
- Small brush to spread the glue
Coloured transparent paper can be ordered on Internet. It is better to get large sheets. The stars are usually more effective with one colour or 2 colours, which are near to each other. That way the geometrical pattern of the folds shows clearer. Coloured tissue paper does not work as well in more complicated stars. It doesn’t let enough light through. It is also too soft, and therefore more difficult to fold exactly.
To make stars is not complicated, but some love of accuracy and patience is needed. Some people have these naturally. We others can develop it. An excellent way to prepare yourself is to introduce the star making to a classroom full of 14-15-years olds, to convince yourself, that this is going to be something great and fun, until you believe you have the power to show that the effort is worth making not only for useful things, but for beautiful things too. After couple of hours of a struggle one is quite happy to retire and can actually enjoy the quiet and solitude of slow-going activity of tens and tens of repeating folds.
It is good to lock yourself into an inaccessible space, put some Christmas music on, and fold without thinking how many pieces are still unfolded. With this attitude the star making can really become quite an enjoyable, almost meditation-like activity…
Instructions for a simple 16 pointed star:
- Draw with pencil, and with the help of the set square, 16 rectangles of for example 4cm x 15cm. (different measurements give different looking stars). The more exact you do this, the happier you are later
- Cut carefully along the lines to get 16 pieces. Again: the more exact, the better.
- Rub carefully the pencil lines away. This is especially important when the star is made from a light colour.
- Start by folding all the pieces lengthwise in half.
- Then open the fold. You will have a centre line. Fold the corners in both ends against the centre line. You will have “arrowheads” in both ends of the piece.

Fold the corner into the centre 
Second fold- corners fold to the centre line - In one end, open the corner folds. You will have a new line running from the centre of the end of the piece to the side of the piece. Fold the corners again against this new fold, and then close the original folds, so that the new one stays inside of them. Then fold the corners once more to the centre line to get narrower arrowhead.

Open the fold and fold the corners to the line 
Second folds are inside the first ones 
Fold the corners once more into the centre - In the other end of the piece fold the corners two more times to the centre line. You will have an even narrower arrowhead in this end.

Fold the corners the second time into the centre 
Fold a third time into the centre - Repeat this for all 16 pieces.

Individual piece folded - When all the 16 pieces have been folded, glue them together. Use the glue only very thinly. The wider ends are joined in the middle, the narrower ends form the points of the star. It is important that the centre ends come neatly together in the middle. In this model the side of each piece runs exactly in the middle line of the piece under it.

Centre points are placed exactly together 
Line the edge of one with the centre of another 
Glueing in process
10. The last piece is tucked under the first one.

11. If some folds are sticking up, brush a drop of glue under them.
Once this basic model is learned, the possibilities of variation are limitless: different folds, different sizes of pieces and different numbers of the points will give new shapes and patterns. Also a smaller and a larger star can be joined together etc. Let your imagination flow, and your stars will shine!

Share this:

Watch Out – There Are Scodoos About… Scodoo Watch
Scoodoos are ancient tree spirits. They have rarely shown themselves to humans in the past but now due to their concern about deforestation and environmental issues, they are reaching out to humans. Sightings are becoming more frequent, keep an eye out, Scoodoos are about…
 Scoodoo sightings are still quite rare. If you see a Scoodoo about, please let us know. There is a form on our Scoodoo sightings page- Scoodoo Watch.

