Spruce trees are a common site in the west of Ireland, not just as part of the alien forestry that covers much of the land, but also you see groups of old trees close to houses, derelict old cottages and lived in houses like ours.
Spruce trees beside our house
That is exactly what we have close to our house, very close. I guess that these spruce trees were originally planted so as to provide shelter from the frequent and strong west winds.Now they have grown tall and cast a shadow over the garden in the evening time. We plant exotic woodland species under them, and hostas thrive there.
The species often seen is Sitka spruce, Picea sitchensis, a fast growing species. It is the most widely planted forestry tree, a non-native species that is controversial. It is favoured by forestry companies due to its rapid growth but it does not do much for enriching the wildlife of the country. Beneath them nothing grows and they have a big impact on acidification of soils.
Spruce trees are a common sight in the west of Ireland
Spruce has been traditionally used as a cough syrup, in fact it is sold in health food shops in that form. Spruce syrup can be made which is quite tasty and sweet and also spruce cordial. I made the cordial which is very nice and refreshing when diluted with sparkling water. The spruce shoot jam is very good too, an almost caramel like flavour with a hint of, spruciness…
To make the jam I first cooked the spruce shoots in water, i used about 2 cups of shoots and covered them with water and cooked simmered for about four hours. After it cooled overnight I strained it through a muslin cloth and then kept the spruce liquid in the fridge.
Recipe
Ingredients:
1 cup of spruce concentrate (see above)
3 Large dessert apples, peeled, cored and chopped finely
2 bottles (2 x 360ml) of apple juice concentrate
Juice of one lemon
Method:
Wash the spruce shoots in cold water
Add the apples, lemon juice and fruit concentrate to the saucepan
Cook with a medium heat until the apple pieces are soft (about 15 minutes)
Add the spruce concentrate
Turn up the heat and cook until the jam starts to thicken, about 15-20 minutes
Spoon or pour into sterilized jam jars and put lids on straight away
It should be warm, warmer than today. I am not under any illusion, I do not expect the sun to shine every day, this is Ireland, but this is May, it should not be freezing!
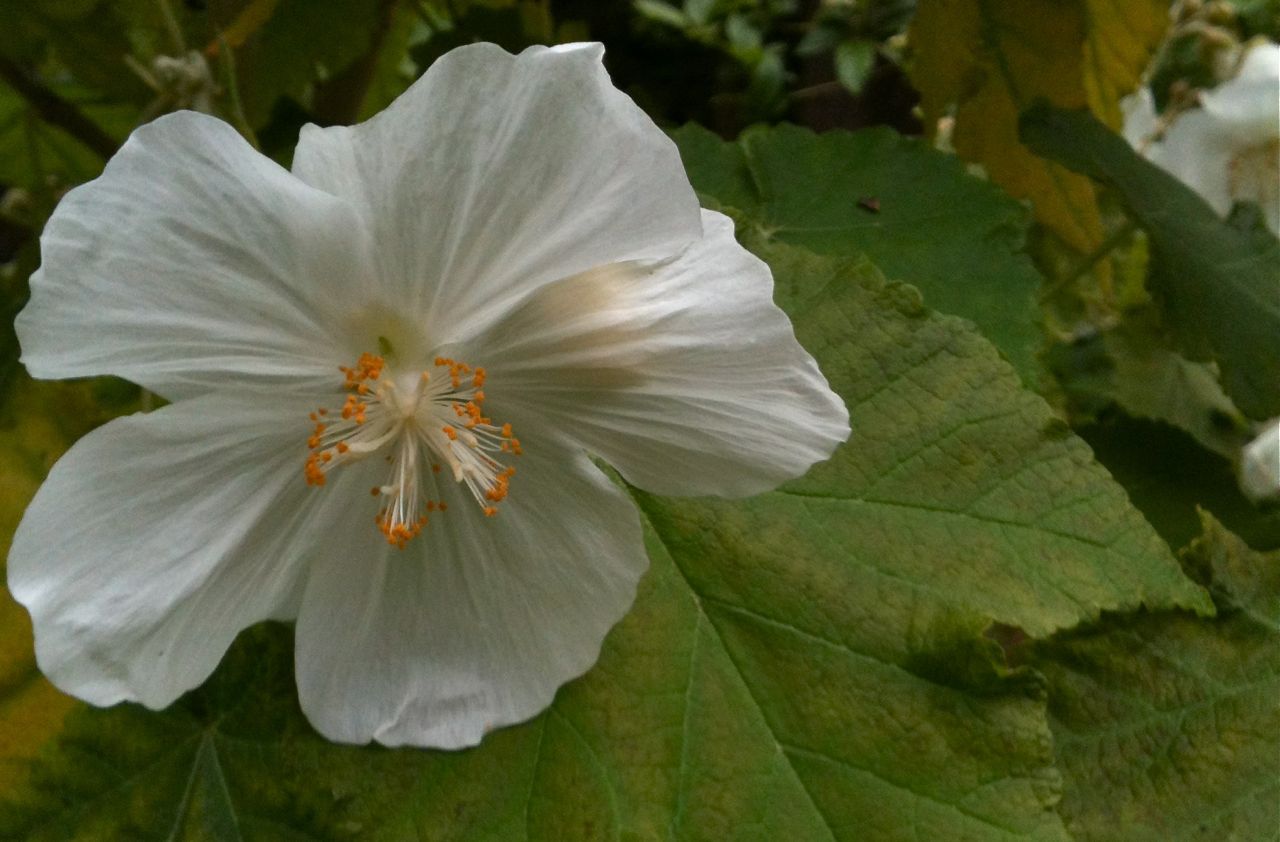
I met a group of my students this morning in the National Botanic Gardens in Glasnevin Dublin, one of our monthly meetings. The sky stayed grey all day and the temperatures remained low. It was sort of surreal to see the beautiful tree peony Paeonia rockii ‘He Ping Lian’ in bloom with its heady scent, but to be freezing cold. Despite the less than comfortable weather we brazed the elements, a bunch of hardy perennials that we are and enjoyed some of the beauty that the botanic gardens always has to share. The copper beach, the floriferous Deutzia and Weigela shrubs, the dainty white bracts of the handkercief tree, Davidia involucrata, all beautiful.
Two of Glasnevin’s own gems were looking particularly fine in the cold; Solanum crispum ‘Glasnevin’ and Deutzia purpurascens ‘Alpine Magician’. The former is the better j=known plant, a scranbling shrub best when trained to support against a wall, at the side of the visitor centre it covers a large portion of red brick wall. It is the best selection of the species, a relative to the spud which is Solanum tuberosum. Native of South America. The ‘Glasnevin’ cultivar is hardier than the species and much more floriferous. It is a vigorous large growing plant that will flower throughout the summer.
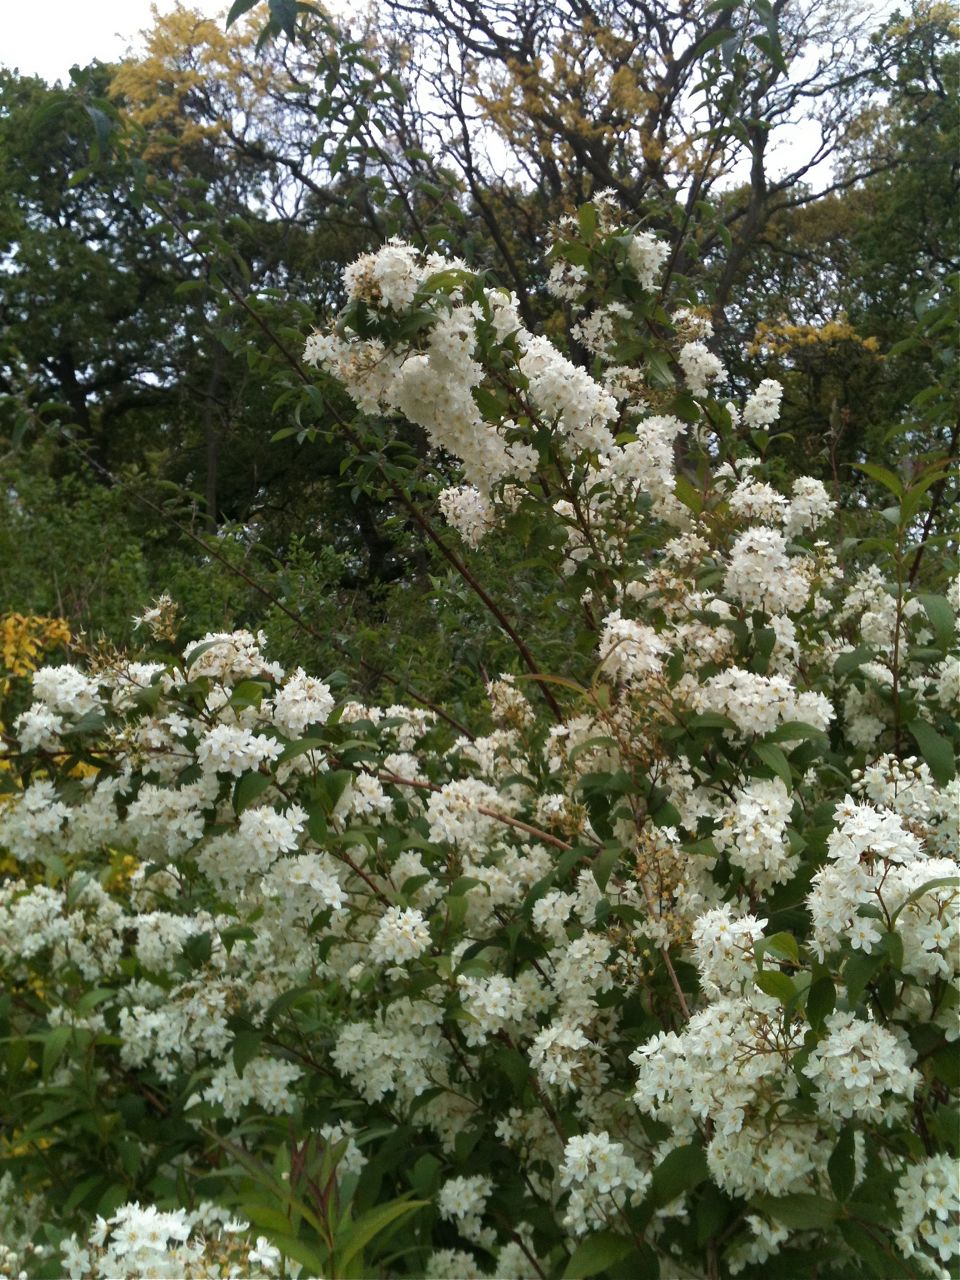
Deutzia purpurascens ‘Alpine Magician’ was named by Charles Nelson who was botanist at the gardens while I was a student there. It was named by him in reference and reverence to Reginald Farrer the great plant hunter and alpine gardener. This particular plant was grown from seed that was collected by farrer in Burma. It is a graceful shrub about 2 metres high and covered in clusters of pink tinged white flowers with red centres. A hardy and floriferous deciduous shrub that is seldom seen in garden centres and nurseries, which is ashame. Luckily there is a fine specimen growing in the woodland garden at Glasnevin for everyone to admire.
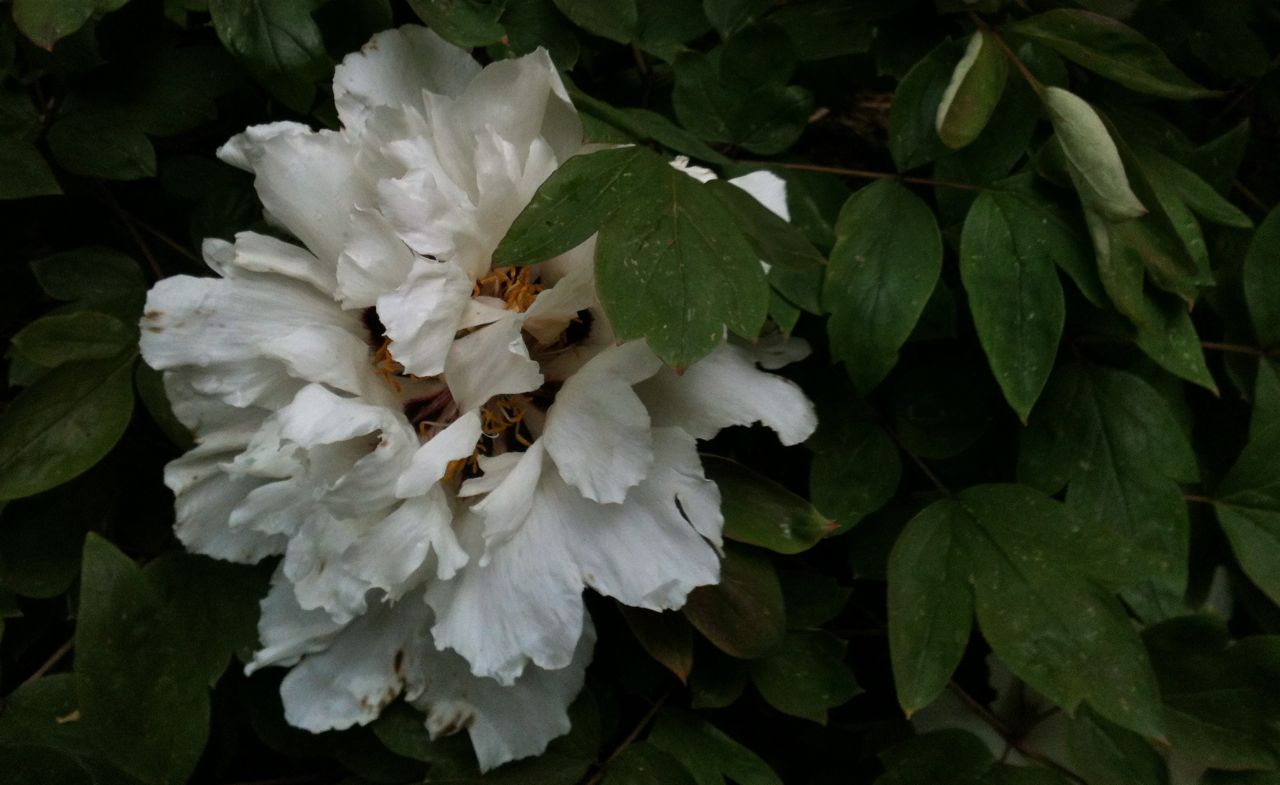
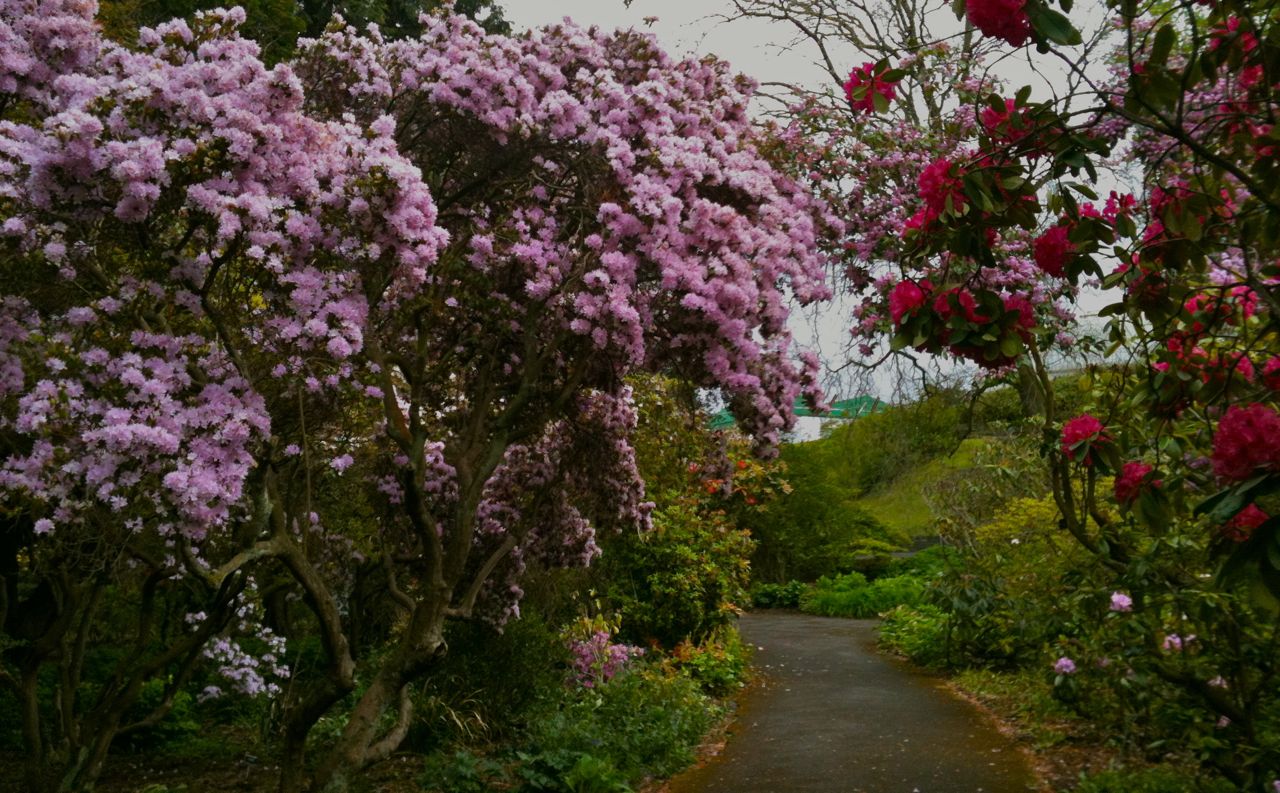
There were many beautiful sights to admire in the gardens, I took some photos with my phone and here they are for you to enjoy too…
Primroses carpet the ground under an old hawthorn tree in our garden, the clothe the soil with a fragility and light, their gentle perfume is a delight. Primula vulgaris is a native plant, a wild flower that is always welcome in our garden. Each year they bring freshness and beauty to the Spring.
Their flowers appear delicate but they are robust plants. The petals of each flower untie at their bases to form a narrow tube that attached to the green stalk. Given a gentle tug, they detach easily from their bases. You can munch them and they taste nice, an unique flavour. I imagined a jam made from them…
Primrose flowers
Based on recipes for rose petal jelly and adapted to include some apple for abit of body here is a jam I made from primroes petals gathered in our garden last weekend. It is deilcious, a flavour which is a mix of fruity sweetness and a late hint of turkish delight…
Recipe
Ingredients:
1 litre of primrose flowers. When foraging for wild food, do not collect flowers, leaves or fruits from beside busy roads, or areas where they are exposed to possible pollution.
2 cups of water
1½ cup of fruit sugar Ii used Fruisana, a fructose based sugar which is lower in calories and has a lower GI rating than ordinary sugar).
2 Apples, peeled, cored and diced finely
Juice of one lemon
Primrose flowers in saucepan
Method:
Wash the flowers in cold water.
Add the flowers petals, water, lemon juice and apple pieces into a saucepan
Cook with a medium heat until the apple pieces are soft (about 15 minutes)
Slowly add the sugar, stirring until the sugar is dissolved
Turn up the heat and cook until the jam starts to thicken, about 25-20 minutes
Spoon or pour into sterilized jam jars and put lids on straight away
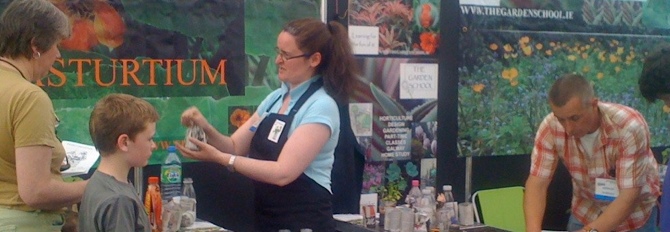
GARDENING IS FOR EVERYONE, YOUNG AND OLD!
WE ARE EXCITED TO BE INVOLVED WITH THE KIDS ZONE AT BLOOM THIS YEAR.
EVERYONE WHO VISITS BLOOM CAN DROP INTO THE GARDEN SCHOOL AND LEARN HOW TO MAKE A POT FROM NEWSPAPER, FILL IT WITH PEAT FREE, ORGANIC COMPOST AND THEN SOW A NASTURTIUM SEED. THEN YOU CAN BRING YOUR POT AND SEED HOME AND WATCH IT GROW.
I am really excited about going to BLOOM this year, more than usual. We have been involved with Ireland’s premier horticulture and food show since it began. The Garden School has been present on the floral pavilion with a display each year, but this year we will be in the Budding Bloomers section, the Kids Zone.
A few years ago we did something similar to this year’s project, making newspaper pots and sowing nasturium seeds. Everyone who visits BLOOM can make a pot and bring it home filled with compost and complete with sown nasturium seed. And it’s FREE!!!
Bloom takes place in the Phoenix Park on Dublin and will feature 25 show gardens, a floral pavilion with lots of plants for sale, a food village and of course lots of things for kids to do too. This year there is free entry for children. Last year BLOOM attracted 90,000 visitors over the bank holiday weekend in June. This year the show will once again be held on the holiday weekend, from Thursday 31st May until Monday 4th June.
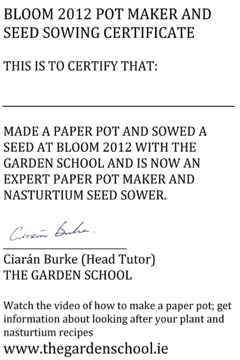
Everyone who makes a pot and sows a seed gets a certificate!
Dandelions, Taraxacum officinale , are the bane of many a gardener’s life. They pop up everywhere, their happy flower heads cheekily appearing in the lawn, in the borders and even in the driveway. They are however nice flowers, they spread like a golden coat over the spring green fields at this time of year. Soon their fluffy seedheads will take to the wind, only to settle in gardens, roadsides and fields. There the seeds will germinate and grow a deep tap root that breaks when gardeners pull them out. Even a small portion of the root remaining in the soil can grow back to taunt us. Well, revenge never tasted so good…
Dandelion flowers in the colander
Recipe
Ingredients:
30 dandelion flowers, collected when fully open and fresh. When foraging for wild food, do not collect flowers, leaves or fruits from beside busy roads, or areas where they are exposed to possible pollution.
½ cup of flower, we used wholegrain spelt.
½ teaspoon of cumin
½ teaspoon of coriander
½ teaspoon of paprika
pinch of chili powder
salt and pepper
oil for frying, we used rapeseed oil.
Fry the flowers until golden brown (2-3 minutes)
Method:
Remove the green calyx from the backs of each flower (that is the green leafy bits attached to the base of the flower).
Wash the flowers in cold water. Don’t dry them.
Mix spices in a bowl with the flour.
Heat the oil in a frying pan.
Dip each flower into the flour and spice mixture and place flower side down on the pan, about 2-3 minutes.
Fry until golden brown and turn the flowers over, let them brown, another 2 minutes.
Remove from the pan and drain on a sheet of kitchen towel.
Eat immediately, savour the flavour and think of all the dandelions that wont be growing in your garden next year!
Drain the fried dandelion flowers on a piece of kitchen towel
A tasty snack in the evening after pulling weeds in the garden for a few hours.
Gorse bushes can be seen all over the countryside, their florescent yellow bloom light the hillsides, a blaze of colour across the land. Unfortunately sometimes their blaze is literal, their oil rich wood all too quickly ignites in dry weather and fires of gorse burn fiercely every year. The truth is that gorse is often hated, it spreads like, well, wild fire, and land is quickly colonized by its spiny stems.
Ulex europeaus; gorse, furze or whin, growing on the road near our house
Even in our own garden, the one acre of land that we endeavour to tame and reclaim from the wild clutches of vegetation, we have a love and hate relationship with this shrub botanically called Ulex europeaus. When the blooms are out their sweet fragrance drifts through the air, along the roadsides as we take a morning walk the sweet coconut scents waft along the country lane. In early morning sunlight the blooms glow bright, it is beautiful, yet we cut it from the garden. There is an old Irish saying that says that the time for kissing is when the gorse is in blossom, Iuckily it is not just our spring walks that are enhanced by this terrible beauty, but at any time of the year you can find a gorse bush in flower.
Gorse shrub flowering by the stream that runs behind our garden
These days a gorse covered field is seen as a waste land, but in times past the gorse, which is also called furze or whin, was seen as a sign of prosperous land. The old Irish saying “An t-ór fé’n aiteann, an t-airgead fé’n luachair agus an gorta fé’n bhfraoch”, says gold under gorse, silver under rushes and famine under heather. Around our garden are rushes, heather and gorse. Heather grows in the bog, rushes in wetter soil but gorse grows on the drier soil. In the past gorse hedges made great barriers for lives stock and walking sticks were made from the wood. But I am sure if you ask most people if there is any use for gorse they will say there is none.
On the way home with the harvest
Each morning as I smell its fragrance on the air if makes me hungry, it has a sweet foody smell, surely there is a use for gorse? After searching for a bit I found a recipe for gorse flowers, gorse cordial. With some enthusiasm my wife Hanna and I brought our wheel barrow for a short walk along the road and cut some flowering shoots, quite a few flowering shoots in fact, a whole wheel barrow full. We wore thick gloves and brought our loppers, they are incredibly spiney. We then brought them home and removed the flowers with a scissors. Below is the recipe that we used, it is quite delicious!
Ingredients
1.5 litre of gorse flowers
250g of fructose sugar (fruit sugar)
900ml of water
Juice of one lemon
Squeezing lemon juice
Method
In a saucepan slowly add the sugar to the water and stir to dissolve. Boil for ten minutes with the lid on.
Place the prepared flowers in a large bowl and pour the sugar and water over the flowers
Add the lemon juice.
Cover with a plate and leave to cool over night
The next morning squeeze the flowers and water though muslin cloth.
Bottle the cordial in sterilized bottles.
Serving
Dilute the cordial with still or sparkling water, about 1:10 (cordial:water or to taste). Refrigerate the cordial after opening.
Tools and Equipment- Teacher Training Workshop, Castlebar, Co. Mayo, Ireland
One of my earliest memories from my childhood is being with my grandfather when he was digging potatoes in a garden in Wexford. He used to do some gardening work for a neighbour after he had finished his postman’s work for the day. I remember too, shifting wheel barrow loads of gravel with my dad and a neighbour to make a drive way when we w moved to out house in Swords, I was seven, probably more in the way of the two men shovelling than I was of any great assistance. But I did shovel gravel into the barrows and I felt like a man, working alongside the grown ups.
My mother had always dreamed of a garden, that is why we moved to a semi-detached cottage two miles from Swords village in north County Dublin in 1977. The front of the house looked over fields which were planted with barley or potatoes each summer, the fields stretched over the county as far as Naul. Often on an afternoon after school or on a summers day, I helped my parents in garden, digging, cutting long grass with a shears, picking strawberries, getting dirty and collecting ladybirds in a jar.
I am very fortunate to have such good memories from my childhood, of those days spent “working” in the garden, my parents doing what their parents had done with them, passing on the experience of working in the garden together. Unfortunately our lives have got a bit complicated and busier, priorities have changed and there has been a disconnection with our garden and our families. Many parents do not have the knowledge and experience to pass on to their children nor to experience such moments themselves and to pass on simple memories and experiences to their children.
Schools are increasingly taking on the role of teaching gardening to children. Perhaps it is time to recognaise that gardening is a necessary life skill, just as everyone should be able to tie their lace they should be able to grow food for themselves and also experience the beauty of nature; the scent of a bloom, the intricate beauty of pattern on flower petals or watch a butterfly flitter past. There is a healing in the soil, my grandfather always said that the answer is always in the soil. therapeutic both also fun and social.
During the week I gave two workshops to a group of teacher in Castlebar, Co. Mayo. It was a great experience and they learnt a lot too. On the first evening we discussed ways of integrating gardening into the school day; filling a simple vase with flowers or branches from the garden, the way to school or children’s garden. Even a bare branch of a birch tree has a beauty in winter. The world of flowers is filled with stories to enthrall children; Fuchsia magellanica, from the exotic continent of South America, the explorer magellan and his exploits! Not only in the classroom, parents can do this at home too.
I told a story of the seed, told in such a way to create a feeling for a seed that a seed is a living thing that aspires to grow and needs our care.Then we dissected the seed so that the teachers could see what a seed is from a scientific perspective, not that it would be doe by the children. We made newspaper pots and sowed nasturtium seeds. School gardens could be beautiful places for learning and social interaction, not just a collection of raised beds.
On the second evening we made a raised bed outside. Some people used a powered screw driver and a saw for the first time. We dug the soil, filled the bed with top soil, planted plants. I finished the workshop with a hugely positive feeling, that there will be more children enjoying gardening in their school days.
Teacher Training Workshop, Castlebar, Co. Mayo, Ireland
Constructing the raised bed
Materials:
3 x 2.4m decking timber 28mm x 130mm
1x 2.4m garden stake 50mm
wood screws (6×70) approx 14 screws
Tools
Powered screw driver with philips no.2 bit
Rubber or wooden mallet
wood saw
spade
shovel
wheel barrow
measuring tape
bamboo canes
builders line or twine
Raised beds offer a number of advantages including increased periods of workability as you do not need to walk on the soil in order to cultivate and plant. Raising the beds can also improve drainage, increase the depth of the topsoil and make working easier as you dont have to bend as far.
Old scaffolding planks can be used instead of treated timber, they have the advantage of being untreated and hard woods and the fact that they are being recycled is a good environmental plus. They can also be half the price. The downside is that they are thicker and harder to get the screws in to and they are wider, therefore more soil will be needed in order to fill the beds. Getting good quality topsoil, cheaply can be difficult.
Position beds in sunny situations, shelter from winds is best for vegetable crops. Avoid over hanging branches of established trees. Construct the beds no wider than 1.2m to ensure that the centres of the beds can be reached from the sides. In theory the beds can be as long as you want, but in practice if the beds are too long, gardeners end up taking short cuts across the beds, this means compacting the soil and in a school situation it creates an unnecessary hazard. 2.4 metre beds are a good size.
Start with cutting one of the decking boards in half, this will give you two ends for the bed.
Mark out the area for the beds using twine and bamboo canes. If laying out a number of beds in a geometric pattern ensure that the beds are square, use pythagoras theorem for getting the corners square and making sure adjacent beds are parallel.
Where grass is present the sod (top 5cm of soil can be removed. this can be buried under the topsoil when digging the or placed in a compost heap.
Place the sides and ends of the beds in position and align the corners. Put two scres from the sides into the end boars and two from the end boards into the sides at each corner.
Ciaran hammering in a post - Teacher Training Workshop, Castlebar, Co. Mayo, Ireland
Check that corners are square and then hammer in posts at each corner and on the sides inside the boards half way. Use a wooden or rubber mallet. The posts should go into the soil as much as the height of the sides. Cut the 2.4 m stake into required lengths for this purpose.
Now that the beds have been constructed, it is time to fill them. It always surprises me just how much soil it takes to fill beds. As the beds are being filled, tread over the soil to settle it, natural settlement will occur anyway, but this reduces it. As you fill in the soil, look out for weed roots and stones which need to be removed.
Teachers around the newly constructed raised bed - Teacher Training Workshop
Some things to watch out for when building beds for schools. Avoid sharp edges on the beds. Look out for any sharp materials that may be in topsoil, things like glass pieces, bits of metal.
Note: 1.2m beds are quite good for adults, perhaps narrower beds of 1 metre would be more suited for young children.
Ciaran and the teachers, teacher training Workshop, Castlebar, Co. Mayo, Ireland


")


